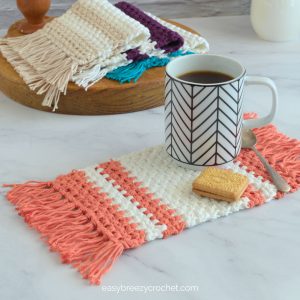
Crochet Mug Rug Pattern
Give this beginner-friendly mug rug crochet pattern a try. It features a simple and easy-to-follow moss stitch pattern, making it ideal for those new to crochet or anyone seeking a quick and enjoyable project.
Print
Pin
Makes: 1 crochet mug rug
What You Will Need
Yarn
- 100% cotton #2 fine (also known as a sport, baby, or 5-ply) yarn with 16 WPI (wraps per inch).
- The pattern is worked in 2 stands of #2 fine yarn.
- Color A - 20.23 yards (18.5meters) per strand, totaling 40.46 yards (37meters).
- Color B - 24.60 yards (22.5 meters) per strand, totaling 49.20 yards (45 meters).
- The above yardage does not include the amount needed for a fringe, this will vary depending on how long you make the fringe on the mug rug.
Hook
- 5mm
Notions
- Scissors
- Yarn Needle
Gauge
- Not important for this pattern
Finished Size
- This mug rug measures 5 ½ by 8 inches (14 x 20cm) without the fringe, using double strands of the yarn weight and hook size mentioned above.
Stitches and Abbreviations Used (US Terms)
- sc – single crochet
- ch - chain
- col - color
- st/sts – stitch/stitches
- sk - skip a stitch
- hk – hook
- rpt – repeat
- [ ] - at the end of a row, indicates the number of stitches in that row
Pattern Notes
- When changing color at the start of a row, cut the previous yarn, leaving a 5-inch (13cm) tail, to be woven into the work.
- Work the pattern in double strands of #2 fine yarn.
Instructions
- Foundation, col A - Ch24
- Row 1 - 1sc in 2nd chain from hk, ch1, sk 1-st, *1sc in next, ch1, sk 1-st, rpt from *1 10 times, 1sc in last st, turn. [12sc, 12 x ch-1 sps]
- Row 2 - Ch1, 1sc in ch-1 sp, ch1, sk 1-st, * 1sc in next ch-1 sp, ch1, sk 1-st, rpt from 10 times, 1sc into top of ch1 made in last row, turn. [12sc, 12 x ch-1 sps]
- Keep repeating row 2 for the rest of the pattern and follow the yarn color changes below.(Note: If you don't want to do the color changes, just keep crocheting in the one color ignoring the color changes below.)
- Rows 3-4 - (2 rows) yarn color A
- Rows 5-7 - (3 rows) color B
- Rows 8-10 - (3 rows) color A
- Rows 11-21 - (11 rows) color B
- Rows 22-24 - (3 rows) color A
- Rows 25-27 - (3 rows) color B
- Rows 28-31 - (4 rows) color A
- Finish - Use a yarn needle to weave in the tail ends.- Complete the mug rug by adding a fringe edging. If you are unsure how to put a fringe on a mug rug, refer to our guide below in the notes section for step-by-step instructions.
Notes
How to Put A Fringe On A Mug Rug?
Here is how to add fringe to a mug rug:
Step 1 - Cut yarn strands double the desired length of the fringe, plus a little extra for trimming. For example, we cut ours into 6-inch (15 cm) lengths by wrapping yarn around a 3-inch (7.5 cm) cardboard piece and cutting one end.
Step 2 - Take the desired number of strands for each fringe (we used 4 strands) and fold them in half.
Step 3 - Insert your hook into the mug rug's end in a space where you would like the fringe placed, then place the folded yarn loops onto the hook.
Step 4 - Pull the hook and strand through the stitch without pulling the ends through. Wrap the ends of the strands around the hook and pull them through the loop, creating a knot. Gently tug on the yarn ends to tighten the knot.
Step 5 - Repeat steps 2-4 along the edge of the mug rug, spacing the fringe strands evenly.
Step 6 - Once all fringe strands are attached, trim them to an even length. We trimmed ours down to 2 inches (5 cm).