As a beginner joining yarn in crochet is something you must know because it allows you to join yarn when you come to the end of a ball.
In this article, we explore four distinct methods for joining yarn in crochet and provide a guide on selecting the most appropriate method for your project.

Just starting out? Our crochet beginner essentials guide covers everything you need to get set up, from tools and yarn to the basic skills you'll use in every project.
Table of contents
How To Join Yarn In Crochet 4 Methods
To join yarn in crochet, there are four methods available: Knot Join, Russian Join, Magic Knot, and Double Crochet Join.
- The Knot Join is the simplest method but may leave an unattractive bump on the work.
- In contrast, the Russian Join creates a seamless join that is suitable for smooth-textured projects.
- The Magic Knot works best for projects with color changes as it creates a secure and almost invisible join.
- For seamless joins in smooth-textured projects and great for joining new colors, the Double Crochet Join is ideal.
When deciding which method to use, consider the texture of your project, the desired final appearance, and the type of yarn you're using.
For textured projects, the Knot Join and Double Crochet Join are appropriate while the Russian Join and Magic Knot work well for smooth projects.
If you're changing colors, the Magic Knot is a good option as it creates a secure join that won't come undone.
Exclusive Printable Crochet Patterns
Be inspired and keep creating!
Join us in The Pattern Vault, Easy Breezy Crochet's exclusive community.
Connect with other crocheters from all around the world and gain access to an extensive library of printable PDF crochet patterns.
All patterns are ad-free and available to you when you want, allowing you to crochet in your own time. So, if you're stuck on inspiration or on the hunt for you next crochet project, the Pattern Vault is for you!
Method 1: Knot Join

The knot join is one of the most straightforward methods for joining yarns.
Simply tie a knot with the old and new yarn, leaving a tail of several inches for each.
Trim the tails close to the knot, and you're ready to continue crocheting.
However, be aware that this method can create an unsightly bump in your work and may not be the best option for projects with a smooth texture.
Method 2: Russian Join

The Russian join is a little more complicated than the knot join, but it creates a more seamless join.
To use this method, thread the end of the new yarn through a tapestry needle and weave it back through the stitches of the old yarn, leaving a tail of several inches.
Then, weave the end of the old yarn through the stitches of the new yarn in the same way, leaving a tail of several inches.
Finally, pull both tails tight to join the two yarns, and trim the excess ends. This method is excellent for projects with a smooth texture, as it creates a nearly invisible join.
Method 3: Magic Knot
The magic knot is a popular method for joining yarn, especially for projects with color changes.
It involves tying a knot between the old and new yarn, but the knot is worked in a way that creates a small, nearly invisible knot.

Step 1 - To use this method, take the end of the old and new yarn and hold them parallel to each other.

Step 2 - Tie a knot with the two ends, making sure to leave a tail of several inches on each side.
Then, tie a second knot, making sure to insert the old yarn end through the loop of the new yarn and the new yarn end through the loop of the old yarn.

Step 3 - Pull both knots tight, and you'll be left with a small, secure knot that won't come undone.

Step 4 - Trim the excess ends close to the knot. This method is great for projects with color changes, as it creates a secure and nearly invisible join.
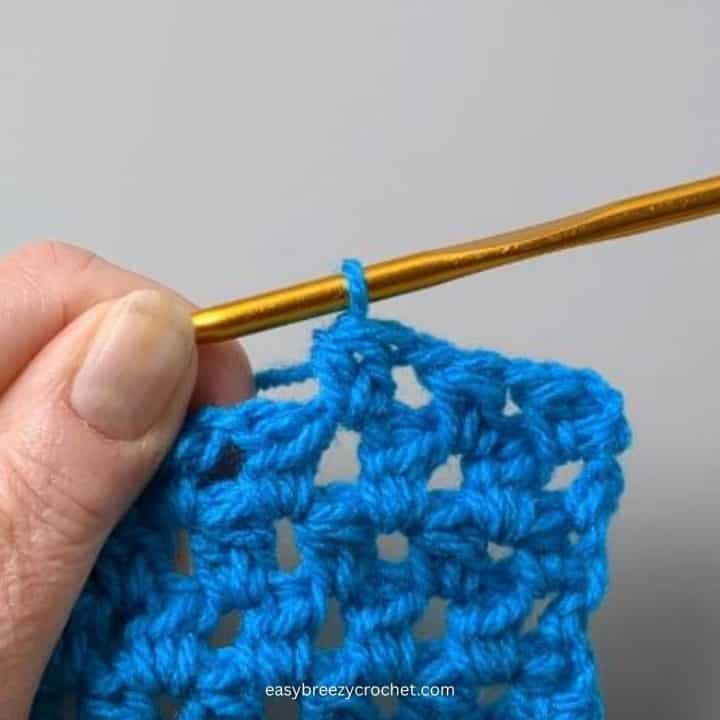
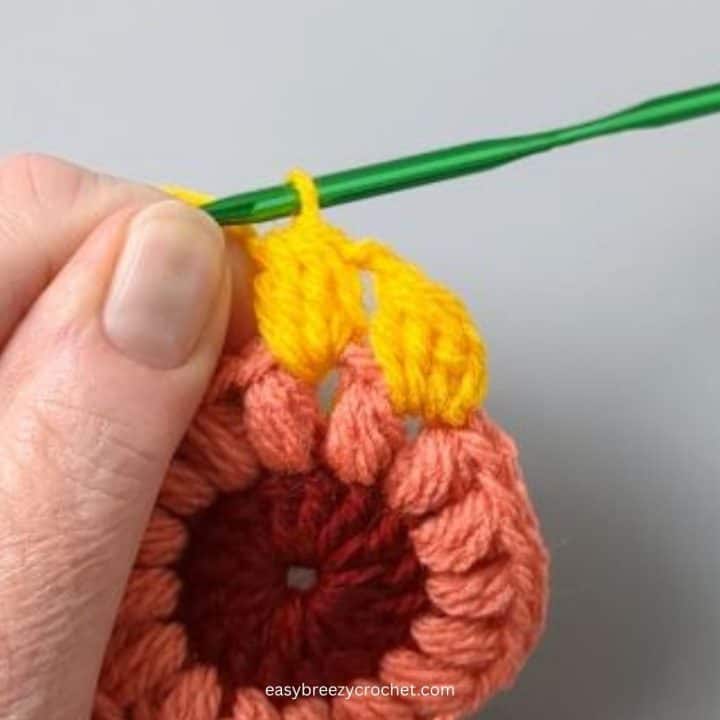
Method 4: Double Crochet Join

The double crochet join is a method that is worked directly into the last stitch of the old yarn.
To use this method, work your last stitch with the old yarn, leaving two loops on the hook.
Then, place the new yarn over the hook and pull it through the two loops on the hook, completing the last stitch with the new yarn.
Continue crocheting with the new yarn. This method creates a seamless join that is great for projects with a smooth texture.
This double crochet join, is the same method that we used in our article on how to change colors in crochet.
Which Method to Choose:
Choosing the right method for joining yarn depends on the project you are working on.
If you are making a textured project, like a blanket with raised stitches, the knot join or double crochet join may be the best options.
However, if you are working on a smooth project, like a scarf or shawl, the
Russian join or magic knot may be better options, as they create nearly invisible joins.
Also, if you are working on a project with color changes, the magic knot is an excellent option, as it creates a secure join that won't come undone.
Tips for Joining Yarn:
Regardless of which method you choose, there are a few tips to keep in mind when joining yarn.
- Always leave a tail of several inches on each side of the join. This will give you plenty of yarn to weave in later and will help ensure that the join doesn't come undone.
- Try to join the yarns in a place where it won't be noticeable in the finished project. For example, if you're working on a scarf, you might want to join the yarns along one of the edges, rather than in the middle of the project.
- When weaving in the ends, be sure to weave them in securely. You don't want your hard work to unravel because the ends weren't woven in properly.
Joining yarn in crochet is an essential skill for any crocheter. Whether you're working on a large project or just need to add a new color, there are several methods to choose from.
The knot join, Russian join, magic knot, and double crochet join each have their advantages and disadvantages, so it's important to choose the method that works best for your project.
By following these tips and practicing your joins, you'll be able to create seamless and beautiful crocheted projects that you can be proud of.
Don't stop here...
Your next 50 crochet projects are ready inside the Pattern Vault - all printable, ad-free, and ready to download instantly.
Frequently Asked Questions
Common mistakes include not leaving enough of a tail on each side, joining in a noticeable place, and not weaving in the ends securely.
Yes, you can join yarns mid-row. Simply follow the instructions for your chosen join method, making sure to leave tails of several inches on each side.
To weave in the ends, thread the tail of the yarn through a tapestry needle and weave it back and forth through the stitches of the project, being careful to avoid creating bumps or puckers.
Trim the excess yarn close to the project. See more detailed instructions on our how to weave in crochet ends page.
You can use the same join method for all your projects, but keep in mind that different methods may work better for different textures and types of projects.
Choosing the right yarn for your project depends on several factors, including the project type, the desired texture and color, and your personal preferences.
It's always a good idea to consult the yarn label for information on gauge, fiber content, and care instructions.
Related Guides
- Learn the most common techniques in our basic crochet stitches guide.
- Ready to try your first project? Explore our ultimate granny square guide.
- Understand sizing with our granny square sizes and uses guide.
- See how projects come together in our guide on how to join granny squares.
Stay Connected
Pin this post - Pin now to and take your skills to the next level.
Leave a comment - We're excited to hear your thoughts! Leave a comment below and let us know what you think.
Share on Instagram or Facebook - Capture the beauty of your finished crochet projects and share it on Instagram or Facebook! Tag us @easybreezycrochet or #ebcrochetcreations so we can see your work!
Copyright Notice - This pattern and its contents are protected by copyright law. It may not be copied, altered, redistributed, resold, translated, or used to produce video tutorials in any format, either in whole or in part.
You are permitted to sell finished items made using this pattern. However, the written pattern itself may not be sold, shared, or distributed in any form. When marketing or displaying your finished items, please photograph your own work and refrain from using any of my original images.
Sharing Guidelines For Roundups - Bloggers you are welcome to include this pattern in roundup posts, as long as you use one photo and link directly back to the original post. For full details, please refer to my Terms of Use page.
Comments
No Comments