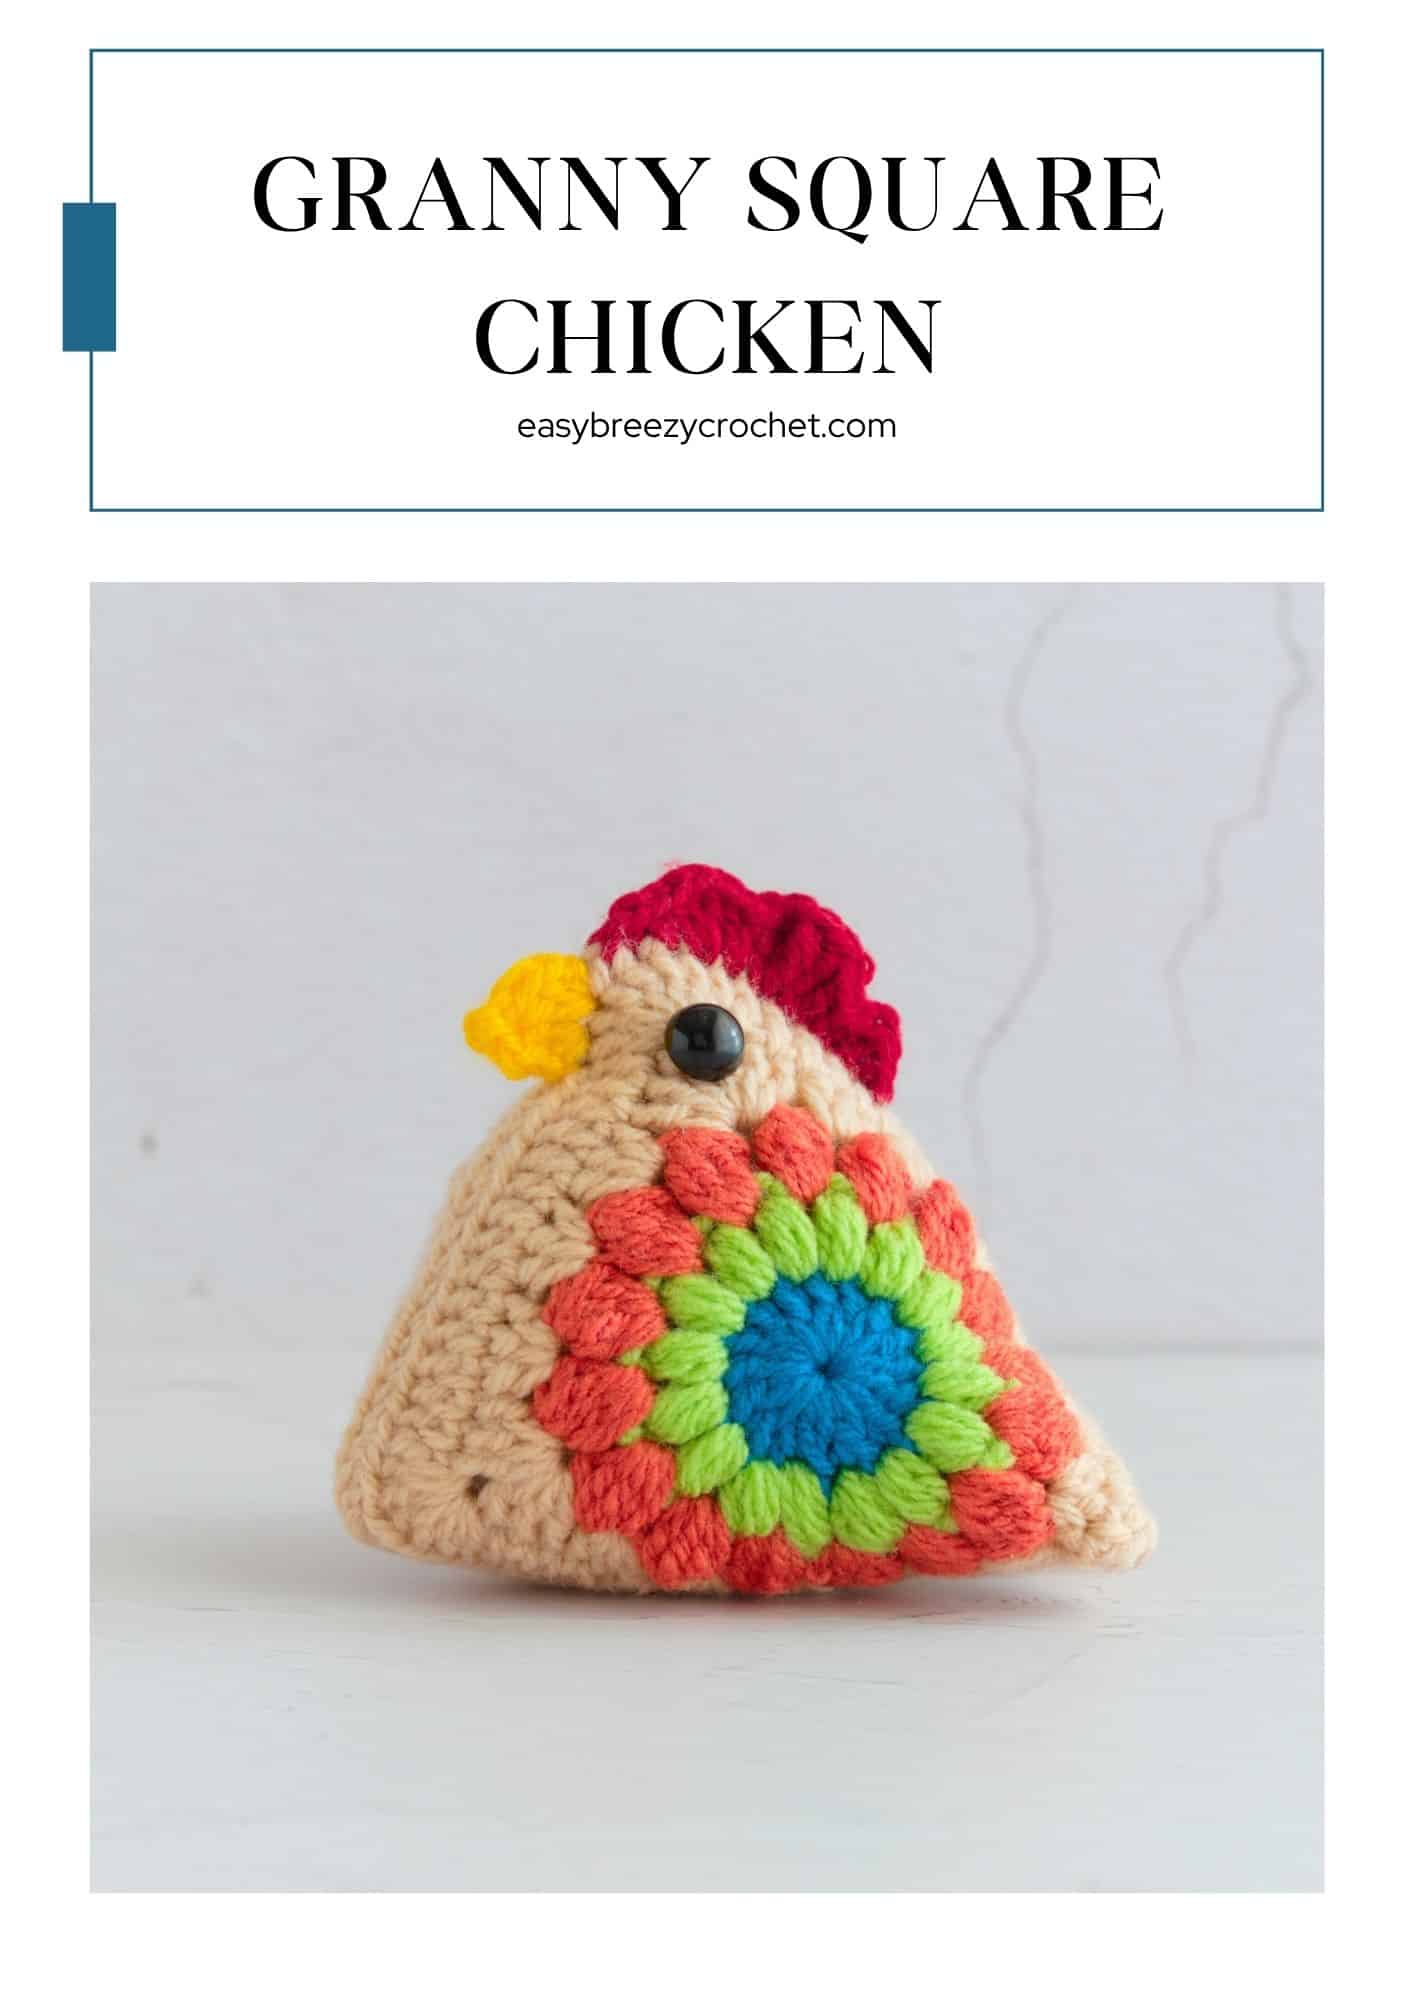
If you love fun and creative crochet projects, this granny square chicken pattern is a great one to try.
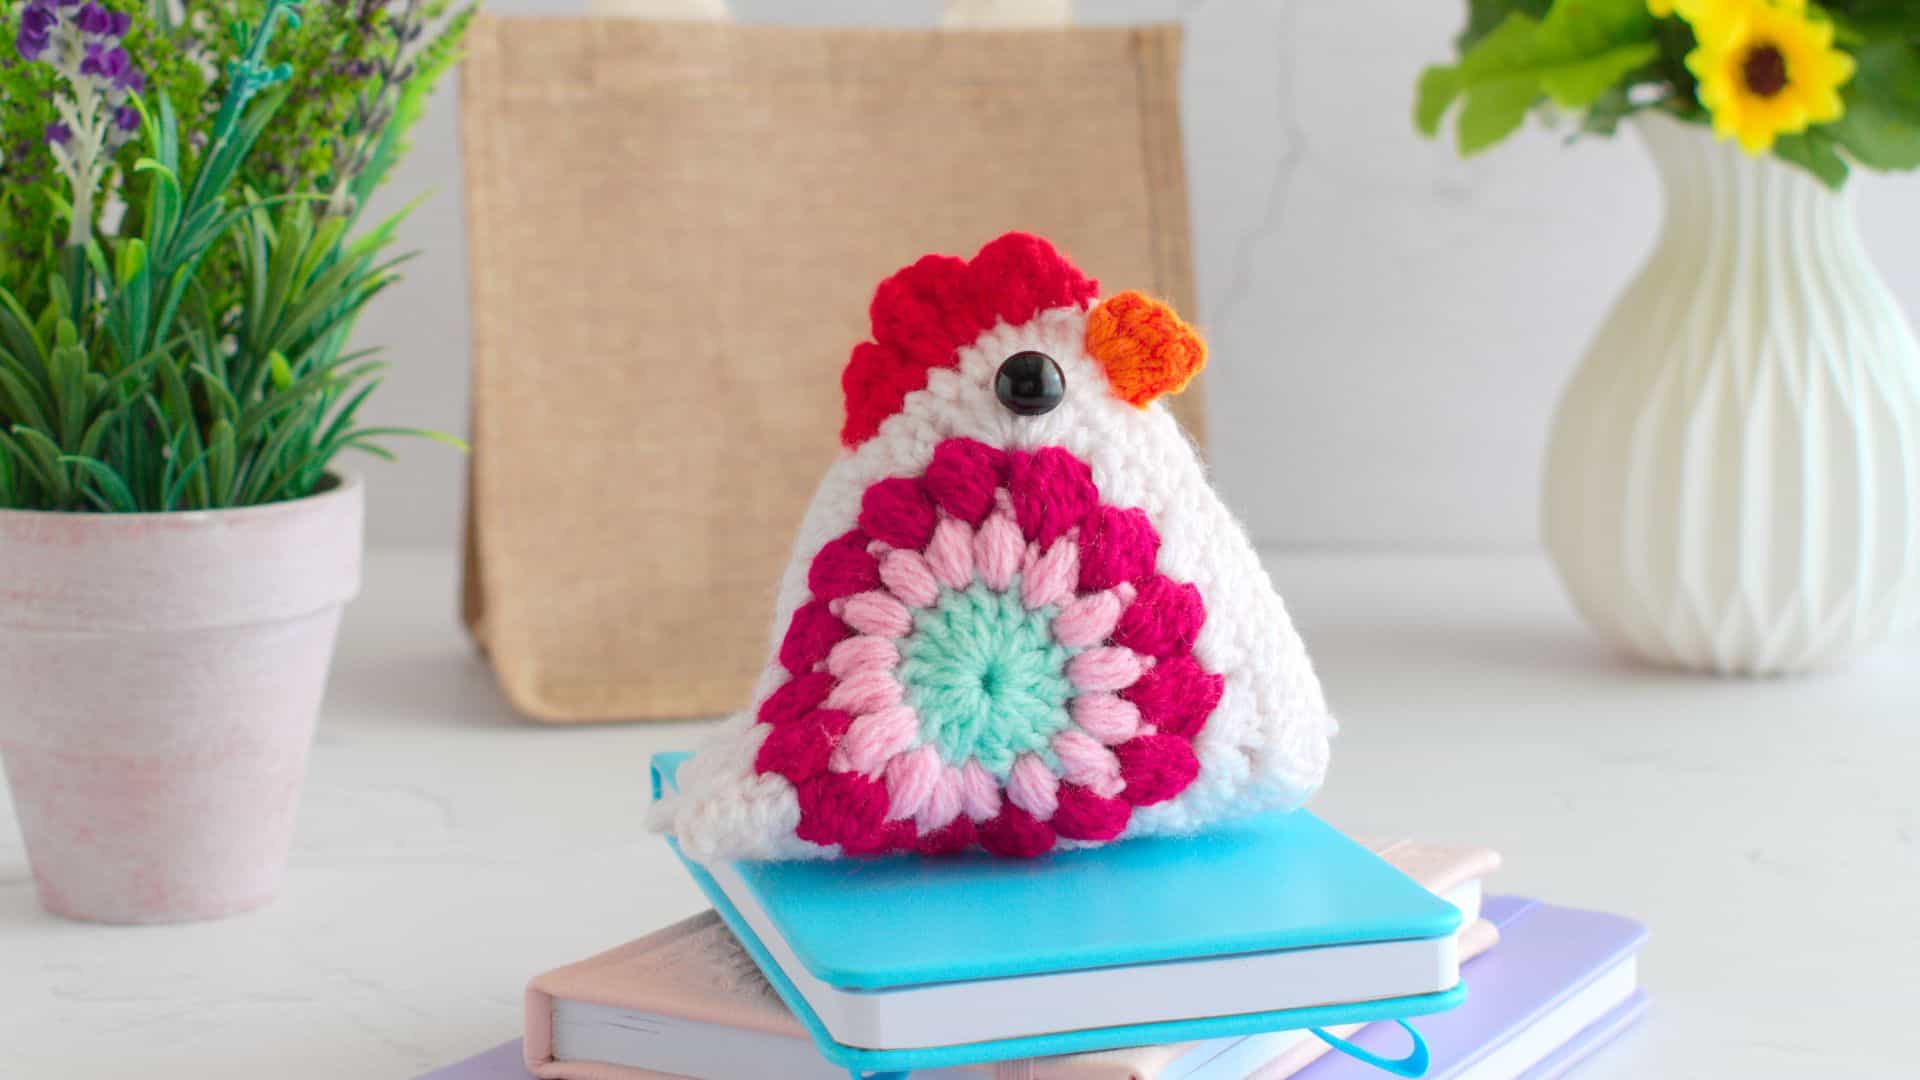
Made using two sunburst granny squares, this cute little chicken is perfect for spring decorating, Easter gifts, or adding a playful handmade touch to your home.
This project is suitable for an intermediate beginner and is a fun way to practice textured stitches while creating something unique.
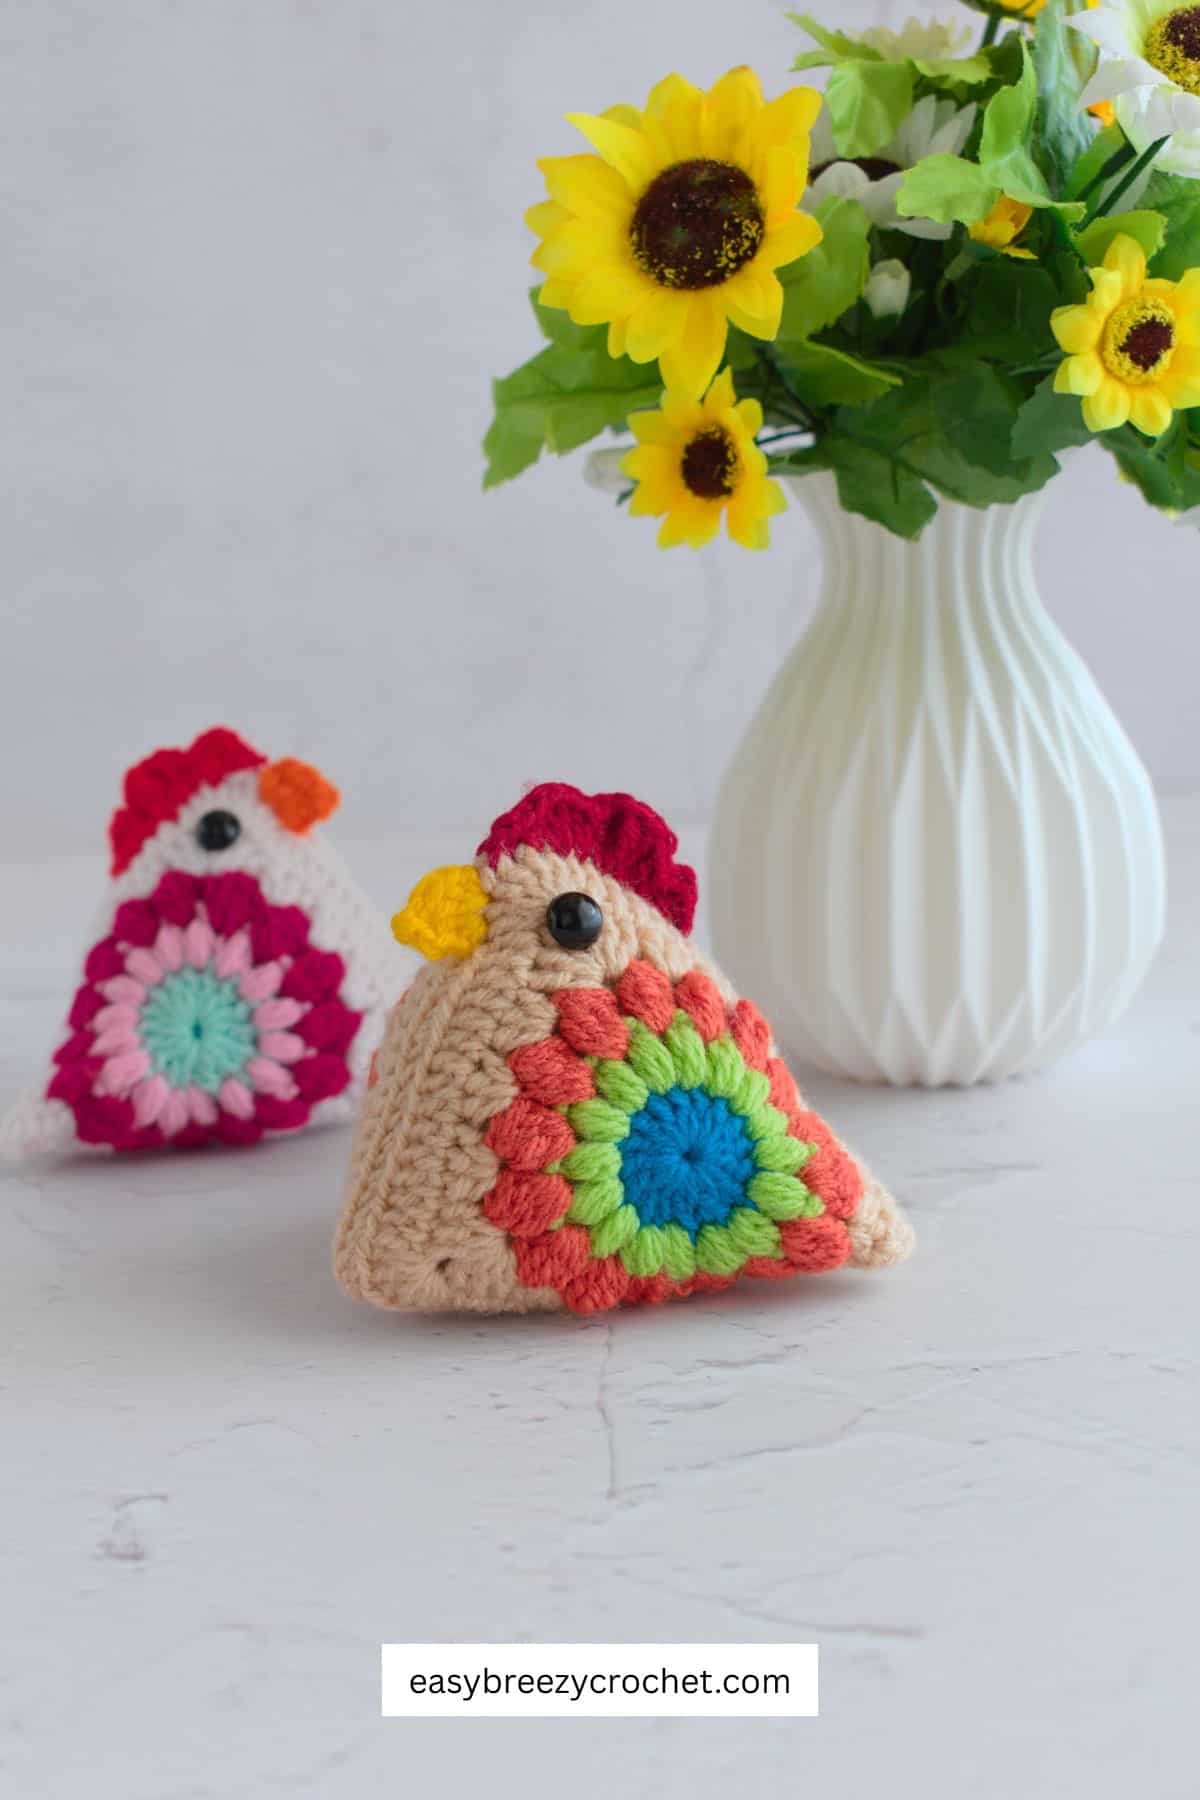
Table of contents
- Pattern Details
- A Fun Granny Square Crochet Project
- Harriet's Notes
- Stitches Used
- Yarn and Hook Information
- Choosing the Right Granny Square
- Customize the Size with Different Yarn
- What You Will Need
- Finished Size & Gauge
- Stitches and Abbreviations (US Terms)
- Pattern Notes
- How To Make A Granny Square Chicken
- Shaping and Assembly
- Comb and Beak Construction
- Tail Feathers and Finishing Details
- Granny Square Chicken FAQs
- A Cute Easter Crochet Idea
- A Creative Spring Crochet Project
- Related Posts
- Stay Connected
- Comments
Pattern Details
- Skill Level - Intermediate beginner
- Yarn Weight - #3 light (DK, light worsted, 8ply)
- Hook Size - 3.5mm (E/4)
- Finished Size - About 4 inches (10cm) at its widest point the tail, and about 4 inches (10cm) tail.
- Time To Complete - less than 80 minutes for an intermediate beginner.
A Fun Granny Square Crochet Project
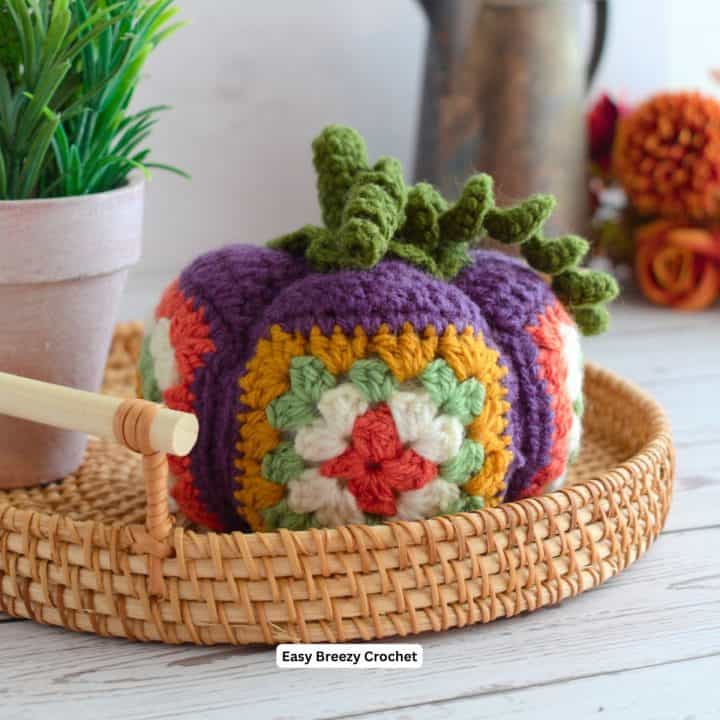
This chicken is made from two granny squares joined together, which are lightly stuffed to give the shape of the chicken. The design uses a sunburst granny square, a popular textured square that features cluster and puff stitches.
Because the chicken is stuffed, we adjusted the stitch pattern slightly in some rounds to make the fabric a little tighter and more compact. This helps to stop the stuffing from showing through the stitches.
Harriet's Notes
This granny square chicken is a fun project that turns simple crochet squares into a playful 3D shape.
While it may look detailed, the construction is straightforward once you understand how the pieces come together.
The two squares do most of the work, and the shaping happens during assembly and stuffing.
When making your squares, try to keep your tension as consistent as possible so both pieces end up roughly the same size.
However, a slight difference in size is completely normal in crochet and nothing to worry about.
If needed, blocking the squares before joining can help even out the shape and make assembly easier.
Take your time with the assembly steps, as this is what gives the chicken its character.
Stitches Used
You will need to know how to make:
- Cluster stitches
- Puff stitches
- Basic granny square techniques
If you already enjoy making granny squares, this project will feel very familiar.
Yarn and Hook Information
For this pattern, we used 100% acrylic yarn and a crochet hook that is half a size smaller than the yarn label recommends.
Using a smaller hook helps create:
- A tighter stitch pattern
- Smaller gaps between stitches
- Less visible stuffing
This simple adjustment makes a big difference when creating stuffed crochet items.
Choosing the Right Granny Square
The chicken is designed using a sunburst granny square, but you can experiment with other granny square patterns as well.
When selecting a square pattern, it's important to choose one that is fairly compact rather than light and lacy.
Dense stitches help create a sturdier fabric which will reduce the amount of stuffing you see when filled.
Customize the Size with Different Yarn
One of the great things about this project is how easy it is to customize the size simply by changing yarn weight.
Make a Mini Version
Use lighter yarn weights like #1 super fine or #2 fine to create a smaller chicken.
These mini versions make great:
- Keychains
- Bag charms
- Crochet bookmarks (add long legs!)
Make a Large Version
Use heavier yarn like #5 bulky or #6 super bulky to make a larger version.
These bigger chickens can become:
- Cute scatter cushions
- Soft plush decorations
When making the larger chickens, crochet large black circles for the eyes to match the bigger scale.
What You Will Need
Yarn
#3 light (DK, light worsted, 8ply) yarn with about 12 WPI*
- Color A, blue - 2.1 yards (2 meters)
- Color B, green - 15.3 yards (14 meters)
- Color C, orange - 15.3 yards (14 meters)
- Color D, beige - 24 yards (31 meters)
- Color E, red (comb) - 2.1 yards (2 meters)
Hook
- 3.5mm (E/4)
Notions
- Scissors
- Yarn needle
- 2 x 12mm glue on eyes
- Fabric glue
- Toy stuffing
Finished Size & Gauge
Finished size - The chicken is about 4 inches (10cm) at its widest point the tail, and about 4 inches (10cm) tail.
Gauge - not so important for this project
Stitches and Abbreviations (US Terms)
- ch - chain stitch
- col - color
- dc - double crochet
- dc5CL - 5 double crochet cluster - see below
- hdc - half double crochet
- hk - hook
- lp/lps - loop/loops
- puff - puff stitch - see below
- rpt - repeat
- sc - single crochet
- sl st - slip stitch
- sp/sps - space/spaces
- tr - treble crochet
- YO - yarn over
- [ ] - at the end of a round indicates the number of stitches in that round.
Special Stitches
dc5Cl - YO, insert hk in a st, YO, pull up loop, YO, pull through 2 loops, (YO, insert hk in same st, YO, pull up loop, YO, pull through 2 loops) four times, YO, pull through all 6 loops on hk, ch1.
Puff - YO, insert hk into st, YO, pull yarn through st (3 lps on hk). YO, insert hk in the same stitch, YO, pull up lp (5 lps on hk). YO, insert hk in same st, YO, pull up lp (7 lps on hk). YO and pull through all lps on hk, ch1.
Note: to start the 1st puff stitch in the row, pull up the loop slightly before making the first YO.
Pattern Notes
- For this pattern use a hook size half a size smaller than the recommended hook, this will help reduce the spaces between the stitches, making the stuffing less noticeable.
Ready to start crocheting?
Download the ad-free printable PDF and keep the pattern at your fingertips - no scrolling, no ads, no distractions. Get yours in our shop.
How To Make A Granny Square Chicken
Make 2 granny squares
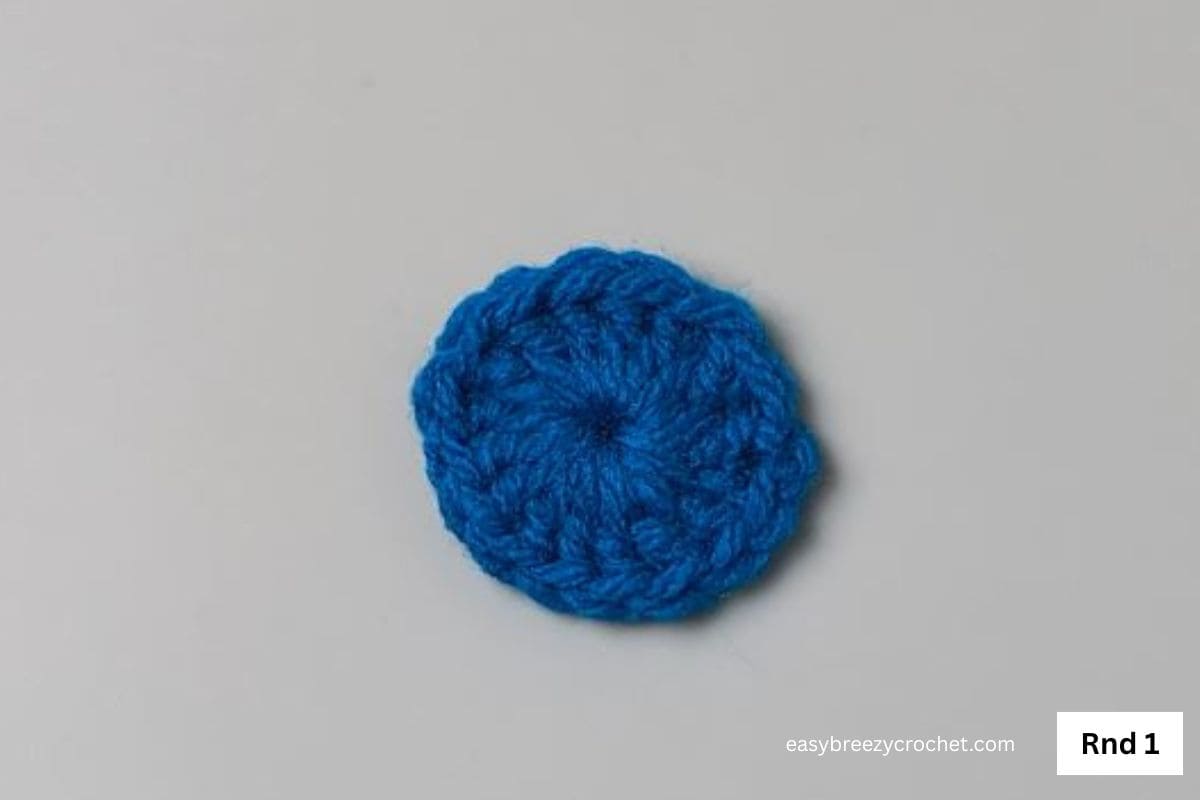
Foundation, col A - ch3, sl st into 1st ch to make a ring.
Rnd 1 - ch2 (count as 1dc), 15dc into ring, crocheting over the yarn tail, sl st into top of ch-2 to join, ch1, cut yarn, fasten off, pull starting yarn tail (the one you crocheted over) to tighten the center ring, weave in all ends. [16dc]
Rnd 2, col B - slip stitch new col into any stitch, puff in each st around, sl st into top of 1st puff to join, ch1, cut yarn, fasten off weave in ends. [16puffs]
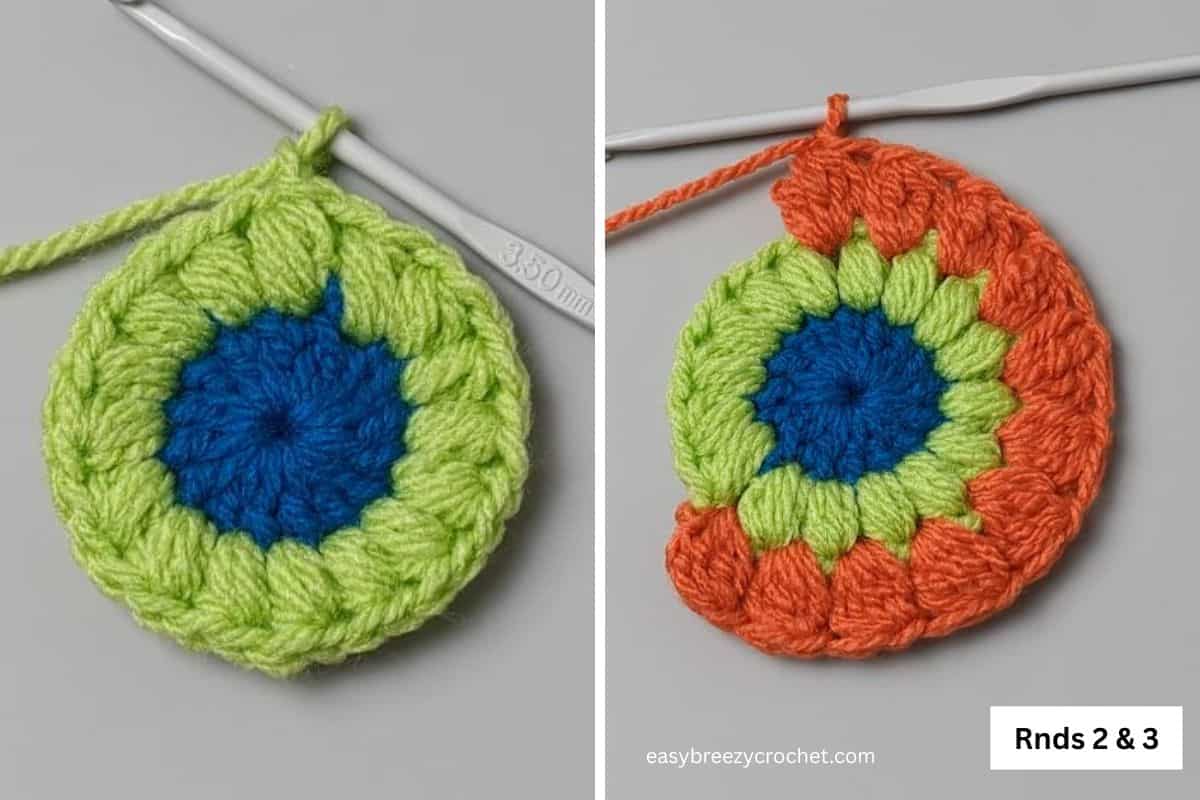
Rnd 3, col C - slip stitch new col into any sp between puffs, ch2 (count as 1dc of dc5CL), dc5CL in same sp as ch-1, dc5CL in next 15 sts, sl st into top of 1st dc5CL to join, ch1, cut yarn, fasten off, weave in ends. [16dc5CL]
Rnd 4, col D - slip stitch new col into any sp between dc5CL, ch2 (count as 1dc), 2dc in same sp as ch2, 3hdc in each of the next 3-sps, *(3dc, ch1, 3dc) in next sp, 3hdc in each of the next 3-sps, rpt from* 3 times, 3dc in same sp as ch-2, 1sc in top of ch-2 to join. [24dc, 36hdc, 4ch1]

Rnd 5 - sl st back into the sp made by the sc, ch2 (count as 1dc), 2dc in same sp, 1dc in next 15-sts, * (3dc, ch1, 3dc) in ch-1 sp, 1dc in next 15-sts, rpt from * 3 times, 3dc in same sp as ch-2, ch1, sl st into top of ch-2 join, ch1, cut yarn, fasten off and weave in ends.
Make one more granny square, when you come to the end of round 5, do not chain 1, instead cut a long yarn tail about 1 yard (1 meter) long and pull the end up through the stitch to fasten off. This long tail will be used to sew the squares together.
Shaping and Assembly
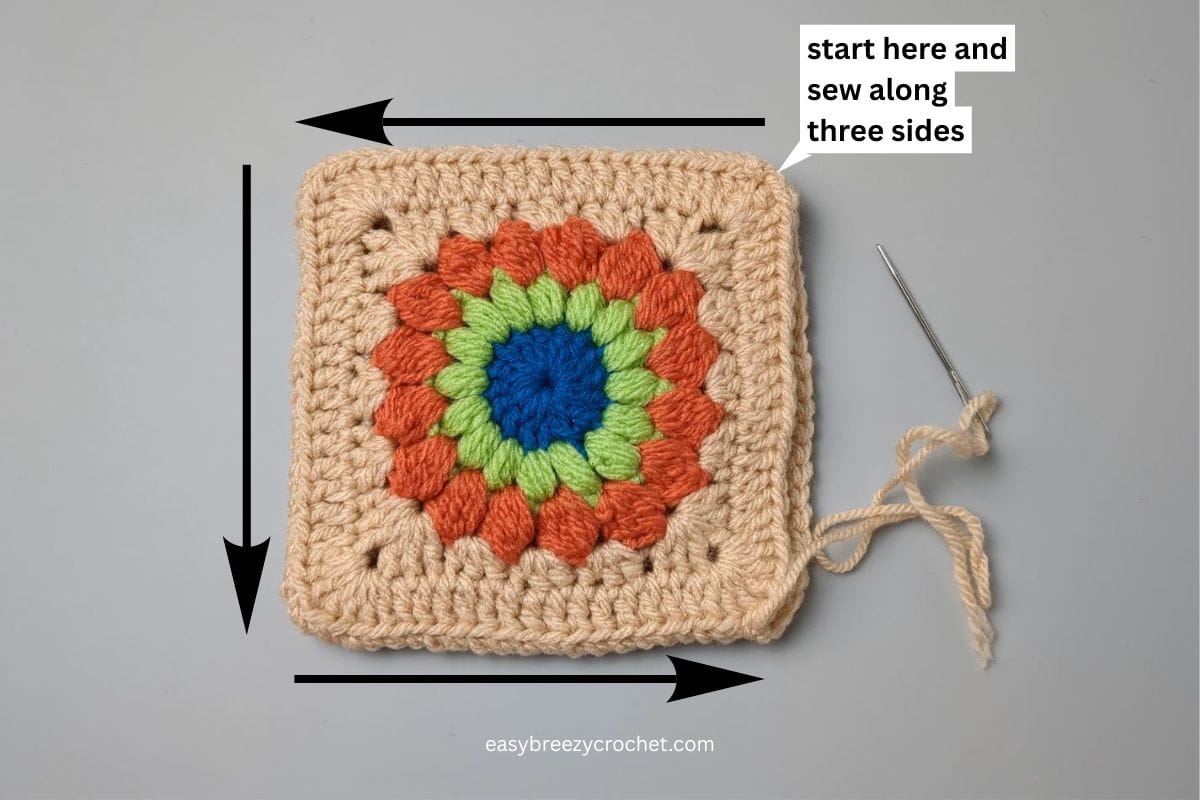
- Thread the yarn tail from the second square onto a needle.
- Place the granny squares together with right sides facing out, matching the corners and stitches.
- Starting at yarn tail corner, join the squares together, sewing into the two corresponding inside loops of the stitches along the sides of both squares.
- Sew three sides together, leave the forth side open, do not cut the yarn tail.
Comb and Beak Construction
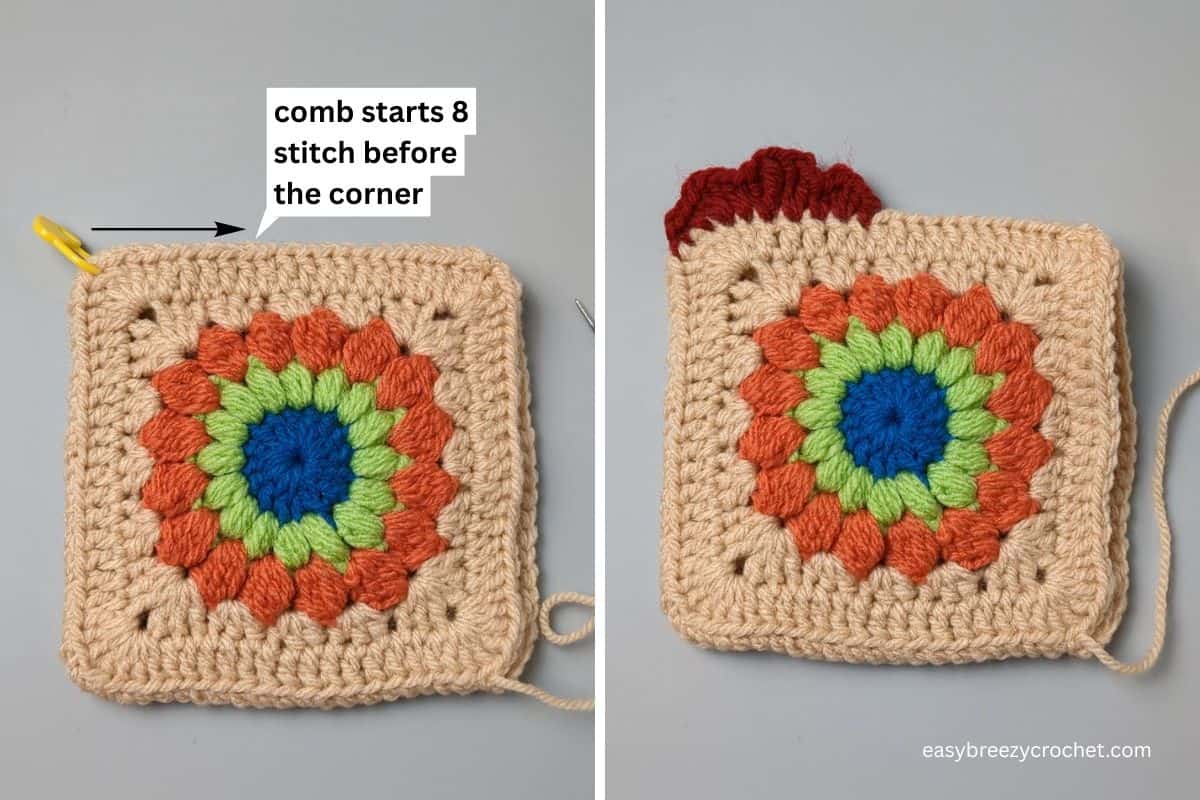
Make the comb
- Starting at the corner at the centre of the first and second sewn sides. Count 8 stitches back (along the first sewn side) from the corner ch-1 sp - slip stitch yarn col E into the st, 1sc in same sp as sl st, (1hdc, 2dc) in next st, (1hdc, 1sc) in next, (1dc, 2tr) in next, (2tr, 1dc) in next, (1sc, 1hdc) in next st, (2dc, 1hdc) in next, 1sc in next 2-sts, sl st in next st, cut yarn fasten off and weave in ends.
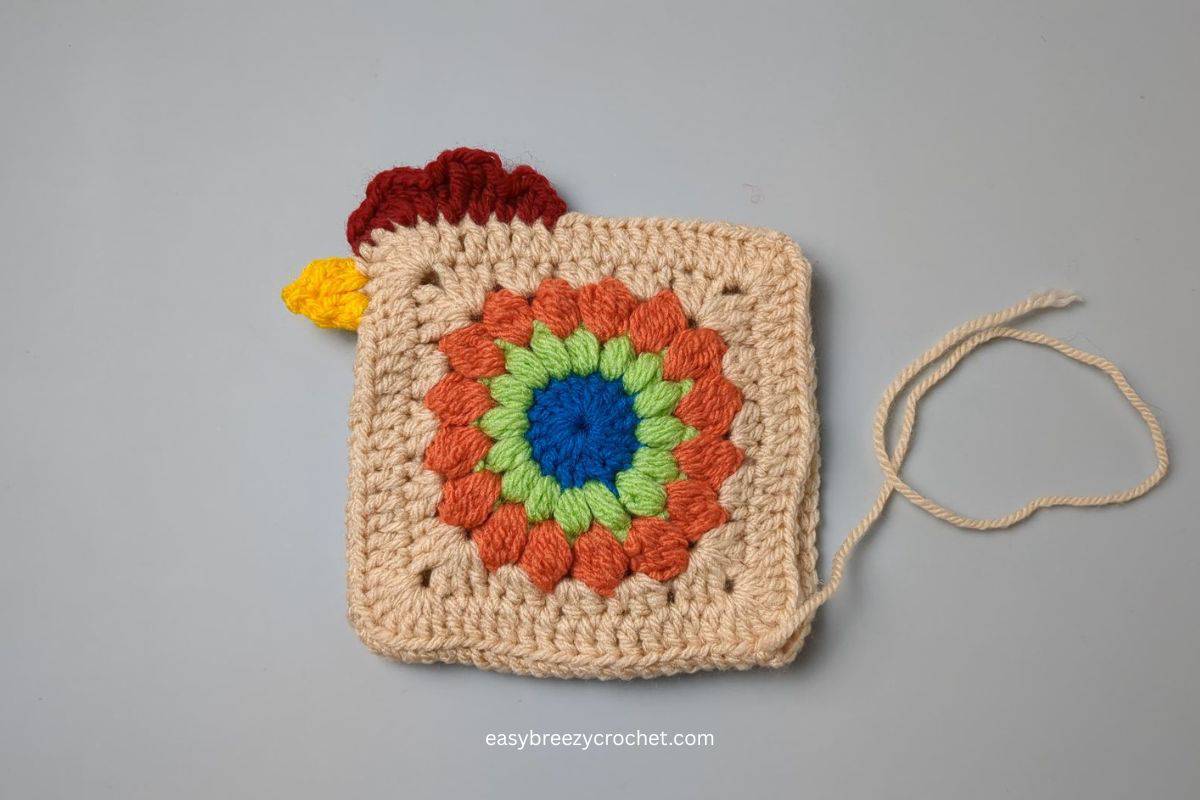
Beak
The beak starts in the next st after the ending sl st of the comb.
Col F, slip stitch, yarn into st, in same sp as sl st (1sc, 1hdc, 1dc, ch2, sl st into 2nd ch from hk), (1dc, 1hdc, 1sc) in next st, sl st into next st, cut yarn, fasten off, weave in ends.
Finish body
- Fill body with stuffing, do not over stuff.
- Close the body. Turn the chicken so that the comb and beak are at the top and facing you - the open end is at the back.
- Place your hands on the open and squash closed so that the joined side seams meet at the center back - you should have a triangle shape - sew the ends together.

Tail Feathers and Finishing Details
Tail feathers
Have the head at the top and facing you, work the stitches into the back of the chicken, along the last edge you closed. Make stitches on both sides of the center back seam and into the center seam itself.
- Slip stitch yarn col D into the st to the right of the center seam, (ch4, 1dc, ch2, sl st into 2nd ch from hk, 1dc, ch4, sl st) into st, sl st into next st (center seam) and (ch4, 1tr, ch2, sl st into 2nd ch from hk, 1tr, ch4, sl st) into the st, sl st into next st, (ch4, 1tr, ch2, sl st into 2nd ch from hk, 1tr, ch4, sl st), ch1, cut yarn, fasten off and weave in ends.
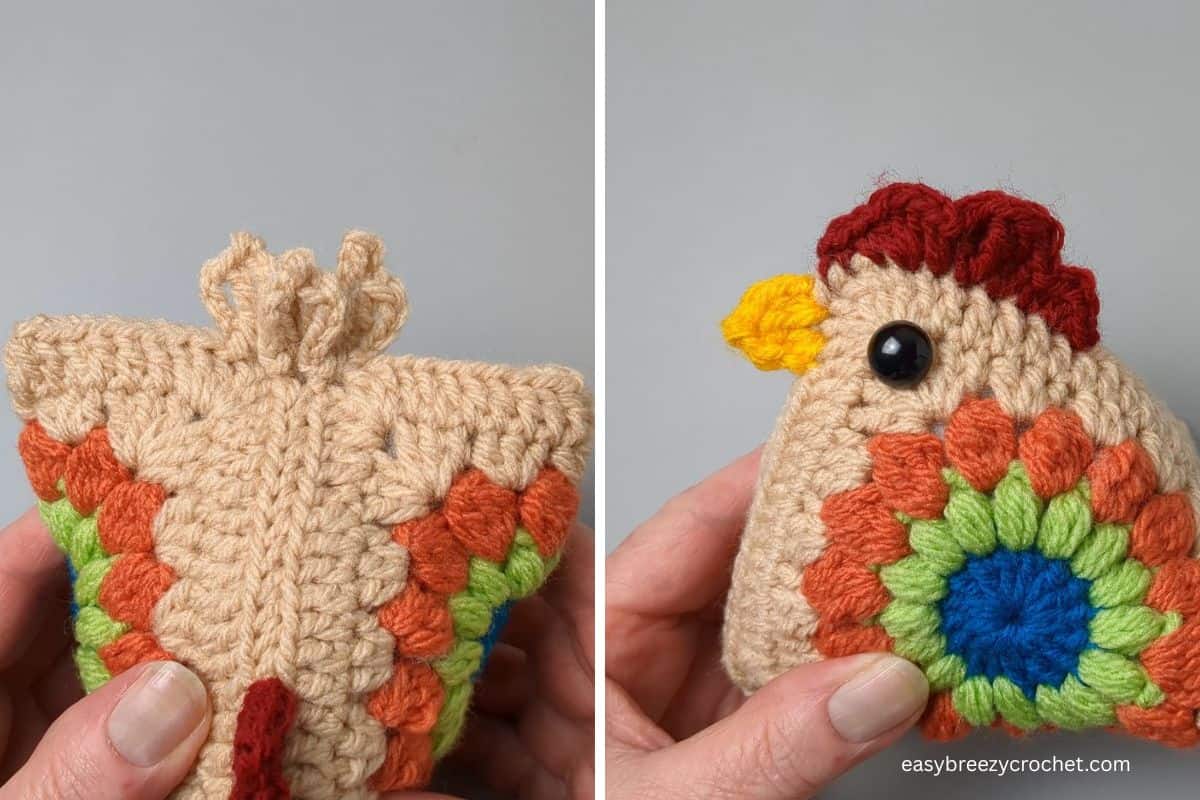
Eyes
- Glue on the e yes, over the granny square corner holes of round 4, below the beak and comb.
Granny Square Chicken FAQs
Yes! Once assembled and stuffed, the chicken is designed to sit upright on a shelf, table, or countertop.
The finished size will vary depending on the yarn and hook used, but the pattern includes measurements for the sample shown.
Absolutely! This is a great stash-busting project and works well with a variety of color combinations.
How much stuffing will I need?
Only a small amount of fiberfill stuffing is needed to give the chicken its shape.
You only need to make two granny squares for this pattern.
Yes! Using a different yarn weight and corresponding hook size will change the finished size of your chicken.
Most crocheters can complete the project in less than 2 hours, making it a fun and satisfying project for gifts or seasonal decorating.
Of course! Traditional chicken colors look great, but this pattern is also perfect for bright, colorful granny squares.
These chickens make adorable shelf sitters, table decorations, gift items, craft fair products, and year-round farmhouse décor.
A Cute Easter Crochet Idea
This crochet granny square chicken makes a lovely handmade decoration for spring.
It's perfect for:
- Easter décor
- Easter basket gifts
- Spring crochet displays
- Handmade holiday decorations
The cheerful design adds a fun seasonal touch to your home.
A Creative Spring Crochet Project
This granny square chicken crochet pattern is a fun and creative way to use classic granny square techniques in a new way. It's quick to make, easy to customize, and perfect for seasonal decorating.
Whether you make a tiny keychain chicken or a large plush cushion, this project is a playful spring crochet idea that's sure to bring a smile.
Related Posts
Stay Connected
Pin this post - Pin now to and take your skills to the next level.
Leave a comment - We're excited to hear your thoughts! Leave a comment below and let us know what you think.
Share on Instagram or Facebook - Capture the beauty of your finished crochet projects and share it on Instagram or Facebook! Tag us @easybreezycrochet or #ebcrochetcreations so we can see your work!
Copyright Notice - This pattern and its contents are protected by copyright law. It may not be copied, altered, redistributed, resold, translated, or used to produce video tutorials in any format, either in whole or in part.
You are permitted to sell finished items made using this pattern. However, the written pattern itself may not be sold, shared, or distributed in any form. When marketing or displaying your finished items, please photograph your own work and refrain from using any of my original images.
Sharing Guidelines For Roundups - Bloggers you are welcome to include this pattern in roundup posts, as long as you use one photo and link directly back to the original post. For full details, please refer to my Terms of Use page.
Comments
No Comments