Learn how to crochet Easter eggs, a fun and easy project for beginners in crocheting!
Ideal for those just starting, you will learn how to make these adorable eggs and bring some homemade happiness to your Easter festivities.

For more simple and fun Easter crochet ideas, visit our Easter Crochet Pattern page.
Table of contents
- About This Easy Crochet Egg Pattern
- Crochet Stitches
- Invisible Decrease (invdec)
- Amigurumi Tips for Beginners
- Yarn To Use
- Step By Step Tutorial
- Skill Level
- What You Will Need
- Finished Size
- Gauge
- Stitches and Abbreviations Used - US Terms
- Special Stitches
- Pattern Notes
- Crochet Easter Egg Pattern
- Finishing
- Easter
- Frequently Asked Questions
- More Free Crochet Patterns
- Stay Connected
- Printable Pattern
- How To Crochet Easter Eggs
- Learn To Crochet
- Comments
About This Easy Crochet Egg Pattern
- If you are new to crocheting, this simple amigurumi project for making Easter eggs is just right for you! Because it is a simple pattern that beginners can make.
- You can follow a straightforward 15-round pattern, beginning from the top and finishing at the bottom, making the process even simpler to follow.
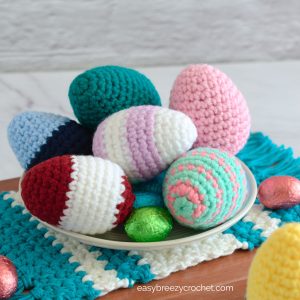
- You can customize your eggs with any color or combination you desire, letting your creativity shine!
- This crochet pattern is free for you to use. You can access a printable pattern card at the end of this post.
Crochet Stitches
This amigurumi pattern requires familiarity with basic crochet stitches including single crochet, and starting with a magic ring for crocheting the pieces.
Invisible Decrease (invdec)
In this pattern, you will need to do something called 'invisible decreases. Do not worry if you are not sure how to do it! Check out our post on making a single crochet invisible decrease to learn all about it. It is easy, I promise!
Amigurumi Tips for Beginners
New to amigurumi? Check out our blog post for beginner-friendly tips! Learn essential techniques and troubleshoot common challenges to make your crochet projects a success.
Yarn To Use
These crochet Easter eggs were crafted using a #4 worsted-weight acrylic yarn, approximately 11 wraps per inch (WPI).
Feel free to experiment with different yarn materials! Cotton yarn or any yarn scraps of similar weight can also be used. Unsure about yarn weights? Refer to our post on wraps per inch to learn more.
For a single-colored egg, stick with one yarn throughout. For more variety, switch yarn colors every few rounds to create multi-colored eggs.
Step By Step Tutorial
Skill Level
Beginner
What You Will Need
We used #4 medium yarn (also known as worsted, Afghan, Aran, or 10 ply) with 11 WPI (wraps per inch).
- 15 yards (13.7 meters) of yarn for each crochet egg you make
Crochet Hook
- 4 mm (G/6) hook
Note: This pattern allows for flexibility with yarn weights. Adjust your hook size to be 1-2 sizes smaller than the recommended size for your chosen yarn. Doing so will create a tighter fabric, preventing the stuffing from showing through.
Notions
- Scissors
- Yarn needle
- Stitch marker
- Toy stuffing
Finished Size

The finished size of the amigurumi Easter egg is about 2.5 inches (5 cm) tall and 6 inches (15.2cm) in circumference, using the yarn weight and hook size mentioned above.
Gauge
The gauge is not important for this project, but making sure the stitches are tight is important.
This prevents the toy stuffing from peeking through. If you notice the filling showing through, consider using a smaller hook size to achieve tighter stitches.
Stitches and Abbreviations Used - US Terms
- MR - magic ring
- sc - single crochet
- invdec - invisible decrease - see special stitches below
- sp - space
- st/sts - stitch/stitches
- rpt - repeat
- hk - hook
- YO - yarn over
- FLO - front of loop
- lp/loops - loop/loops
- [ ] - at the end of a round indicates the number of stitches in that round
Special Stitches
invdec - Insert hk in FLO of next st, then in FLO of next st, YO, pull through 2-lps, YO, pull through 2-lps.
Copyright Notice - This pattern may not be copied, modified, redistributed, resold, or used to create video tutorials in any format. Translating and publishing this pattern, whether in whole or in part, is also prohibited.
Sharing Guidelines For Roundups - Bloggers you are welcome to include this pattern in roundup posts, as long as you use one photo and link directly back to the original post. For full details, please refer to my Terms of Use page.
Pattern Notes
- Crochet the egg in a continuous round from the top down, avoiding joining the rounds.
- To keep track, use a stitch marker to mark the first stitch of each round as you progress.
- Ensure the pattern stays accurate by counting the stitches in each round.
Crochet Easter Egg Pattern
Round One
Round 1 - Make 6 single crochet into a magic ring. [6 single crochets in this round.]
Abbreviated version
Rnd 1 - 6sc in MR. [6sc]
Round Two
Round 2 - Make 2 single crochet in each of the next 6 stitches. [12 single crochets in this round.]
Abbreviated version
Rnd 2 - 2sc in next 6-sts. [12sc]
Round Three
Round 3 - Make 1 single crochet in each of the next 12 stitches. [12 single crochets in this round.]
Abbreviated version
Rnd 3 - 1sc in next 12-sts. [12sc]
Round Four
Round 4 - Make * 1 single crochet into the next stitch, then make 2 single crochets in the next, repeat from * 6 times. [You should now have 18 single crochets in this round.]
Abbreviated version
Rnd 4 - * 1sc in next st, 2sc in next, rpt from * 6 times. [18sc]
Round Five
Round 5 - Make 1 single crochet in each of the next 18 stitches. [18 single crochets in this round.]
Abbreviated version
Rnd 5 - 1sc in next 18-sts. [18sc]
Round Six
Round 6 - * 1 single crochet into each of the next 2 stitches, then make 2 single crochets in the next, repeat from * 6 times. [You should now have 24 single crochets in this round.]
Abbreviated version
Rnd 6 - * 1sc in each of the next 2-sts, 2sc in next, rpt from 6 times. [24sc]

Rounds Seven to Twelve
Rounds 7-12 (5 rounds) - Make 1 single crochet in each of the next 12 stitches. [24 single crochets in each round.]
Abbreviated version
Rnds 7-12 (5 rnds) - 1sc in next 24-sts. [24sc in each rnd]
Round Thirteen
Round 13 - * 1 single crochet in the next 2 stitches, then make an invisible decrease, and repeat from * 6 times. [You should now have 18 single crochets in this round.]
Abbreviated version
Rnd 13 - * 1sc in next 2-sts, invdec, rpt from * 6 times. [18sc]
Round Fourteen
Round 14 - * 1 single crochet in the next stitch, then make an invisible decrease, and repeat from * 6 times. [You should now have 12 single crochets in this round.]
Abbreviated version
Rnd 14 - * 1sc in next st, invdec, rpt from * 6 times. [12sc]
Stuff - Fill with stuffing after round 14.

Round Fifteen
Round 15 - Make an invisible decrease, repeat 6 times, cut yarn, leave a 6-inch (15 cm) yarn tail, and fasten off. [You should now have 6 stitches in this round].
Abbreviated version
Rnd 15 - invdec, rpt 6 times, cut yarn, leave a 6-inch (15 cm) yarn tail, and fasten off. [6sts]
Finishing
Thread the yarn tail onto a tapestry needle, and slip the needle under each of the front loops of the stitches in the last round, pull tight, and weave the yarn tail inside the Easter egg to hide the tail.

Easter
- Crochet Bunny Pouch - Easy No Sew Pattern
- Easy Amigurumi Bunny (Wilbur)
- Crochet Peeps Bunny Pattern
- Crochet Bunny Patterns
- Easy Bunny Crochet Pattern (Eggburt)
- Free Crochet Bunny Rabbit Pattern For Beginners (Polly)


Frequently Asked Questions
Here is how to crochet mini Easter eggs. Use this pattern and make them in a lighter yarn and with a smaller hook.
For example, you could use #3 light (DK, 8-ply) yarn and a 2.5 or 3 mm hook for an egg smaller than the one made on this page. Or make it in #2 sports (baby, 5-ply) yarn and a 1.6 or 2.25 hook for an even smaller mini Easter.
More Free Crochet Patterns
- Crochet sunflower coasters with basket
- Easy rectangle crochet shawl pattern
- Moss stitch dishcloth pattern
- Easy crochet dishcloth pattern
- Suzette crochet washcloth
- Easy crochet dishcloth patterns
- Small crochet drawstring pouch
- Double crochet Coasters and basket
- Small Crochet basket pattern with handles
- Bunny applique pattern

Stay Connected
Pin this post - Pin now to and take your skills to the next level.
Leave a comment - We're excited to hear your thoughts! Leave a comment below and let us know what you think.
Share on Instagram or Facebook - Capture the beauty of your finished crochet projects and share it on Instagram or Facebook! Tag us @easybreezycrochet or #ebcrochetcreations so we can see your work!
Printable Pattern
How To Crochet Easter Eggs
What You Will Need
Yarn
- We used #4 medium yarn (also known as worsted, Afgan, Aran, or 10 py) with 11 WPI (wraps per inch).
- 15 yards (13.7 meters) of yarn for each crochet egg you make
Hook
- 4 mm (G/6) hook
- Note: This pattern allows for flexibility with yarn weights. Adjust your hook size to be 1-2 sizes smaller than the recommended size for your chosen yarn. Doing so will create a tighter fabric, preventing the stuffing from showing through.
Notions
- Stitch marker
- Toy stuffing
- Scissors
- Yarn needle
Gauge
- Not important for this pattern.
Finished Size
- The finished size of the amigurumi Easter egg is about 2.5 inches (5 cm) tall and 6 inches (15.2cm) in circumference, using the yarn weight and hook size mentioned above.
Stitches and Abbreviations Used (US Terms)
- MR - magic ring
- sc - single crochet
- invdec - invisible decrease - see special stitches below
- sp - space
- st/sts - stitch/stitches
- lps - loops
- hk - hook
- rpt - repeat
- YO - yarn over
- FLO - front of loop - see special stitches below
- [ ] - at the end of a round indicates the number of stitches in that round
Special Stitches
- invdec - Insert hk in FLO of next st, then in FLO of next st, YO, pull through 2-lps, YO, pull through 2-lps.
Pattern Notes
- The crochet egg is worked in a continuous round from the top down, so do not join the rounds.
- Use a stitch marker to make the first stitch of each round as you go.
Instructions
- Rnd 1 - 6sc in MR. [6sc]
- Rnd 2 - 2sc in next 6-sts. [12sc]
- Rnd 3 - 1sc in next 12-sts. [12sc]
- Rnd 4 - * 1sc in next st, 2sc in next, rpt from * 6 times. [18sc]
- Rnd 5 - 1sc in next 18-sts. [18sc]
- Rnd 6 - * 1sc in each of the next 2-sts, 2sc in next, rpt from 6 times. [24sc]
- Rnds 7-12 (5 rnds) - 1sc in next 24-sts. [24sc in each rnd]
- Rnd 13 - * 1sc in next 2-sts, invdec, rpt from * 6 times. [18sc]
- Rnd 14 - * 1sc in next st, invdec, rpt from * 6 times. [12sc]
- Fill egg with stuffing.
- Rnd 15 - invdec, rpt 6 times, cut yarn, leave a 6-inch (15 cm) yarn tail, and fasten off. [6sts]
- Finish - Thread the yarn tail onto a tapestry needle, and slip the needle under each of the front loops of the stitches in the last round, pull tight, and fasten off to secure the end-in-place cut yarn.
Learn To Crochet
If you are new to crochet and would like to learn more. You might like these:
Susan says
Even though it's not Easter, my daughter wanted to make some Easter eggs! This pattern was so easy for her to follow, and she made such gorgeous eggs. Thanks so much for sharing this pattern.
Colleen Klaassen says
Hi Harriet! I really enjoy your crochet site! I recently made Eggert, what a cutie! I especially like the little bum cheeks ! What a cute little detail. Thank you so much!
Harriet says
Thank you.