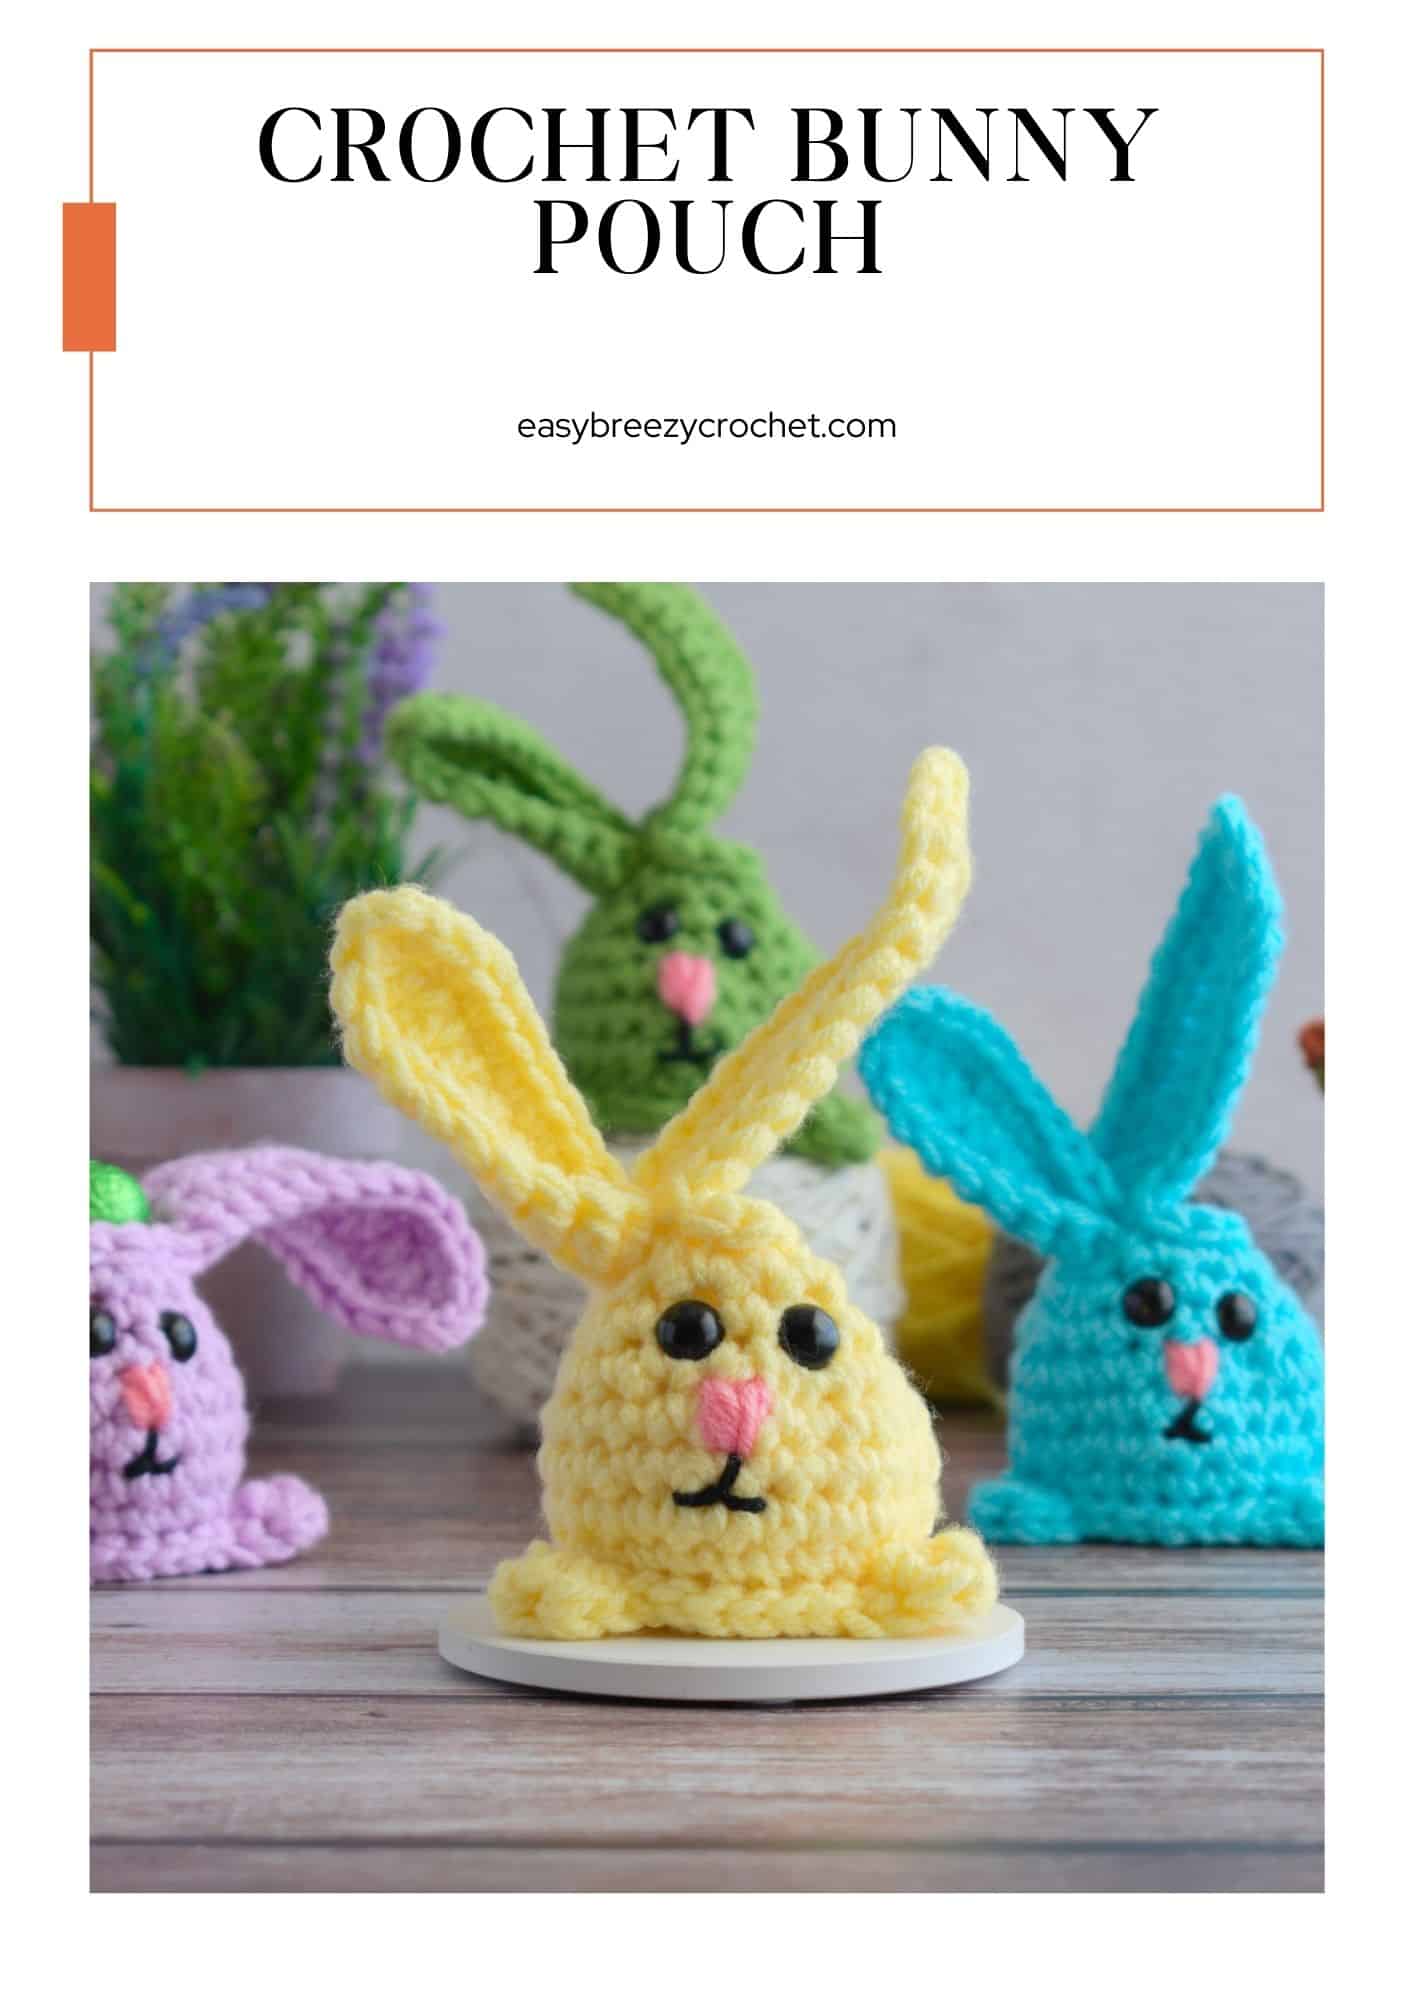
This crochet bunny pouch is as cute as it is functional! When closed, it looks like a little crochet egg bunny, complete with crocheted feet, nose, and tail - no sewing required!
The bunny ears form the closure, making it a unique and practical storage pouch. Perfect for holding treats, trinkets, or small gifts, this quick and easy pattern is great for Easter, spring crafts, or any occasion.

Explore similar patterns in our crochet bags and storage hub.
Table of contents
- Get Ready To Crochet A Cute Bunny Pouch
- Why You Will Love This Pattern
- Pattern Details
- About This Pattern
- Crochet Stitches
- Yarn and Hook Information
- What You Will Need
- Finished Size & Gauge
- Stitches and Abbreviations Used - US Terms
- Special Stitches
- Pattern Notes
- Pattern Instructions
- Finishing The Crochet Bunny Pouch
- Tips
- Variations/Color Schemes/Ideas:
- Creative Bunny Pouch Projects: Fun Alternatives and Crochet Ideas for Easter
- More Easter Crochet Patterns
- Quick Crochet Reference Guide
- Related Guides
- Stay Connected
- Comments
Get Ready To Crochet A Cute Bunny Pouch
Looking for a fun, no-sew crochet project?
This crochet bunny pouch is both cute and practical! It comes with built-in feet, nose, and a fluffy tail, so there's no need to sew on extra pieces.
The best part? The bunny ears act as a closure, keeping everything inside safe and secure. Made with worsted-weight acrylic yarn, this pouch is easy to customize with different yarns for new textures.
Whether you use it as a treat bag for Easter, a small gift pouch, or even as a fun storage idea, this bunny pouch works for any occasion. Its egg-like shape also makes it a great addition to an Easter basket or spring décor.
With a simple, beginner-friendly design, this pouch is quick to crochet and sure to be a favorite!
Why You Will Love This Pattern
- No-Sew Design - Everything is crocheted in, so there's almost no sewing required, except for the bunny mouth and weaving in the ends.
- No drawstring - The bunny ears act as a closure, keeping the pouch secure.
- Quick & Easy to Make - Perfect for a fast crochet session.
- Beginner-Friendly - Simple stitches make it an easy crochet project.
- Great for Gifts & Treat Bags - This is a great crochet bunny candy holder for Easter, use a gift bag for birthdays, and special occasions.
- Customizable - Change the colors or add details to personalize your pouch.
- Small & Portable - Great for keeping little items organized on the go.
- Versatile Use - Works as a favor bag, a small storage pouch, or a fun crochet Easter bunny decoration.
Pattern Details
- Skill Level - Intermediate beginner
- Yarn Weight - #4 worsted
- Hook Size - 6.5
- Finished Size - about 3 inches (7.6 cm) wide, 3.25 inches (8.3 cm) to the top of the pouch opening, and about 7 inches (18cm) tall to the tip of the ear when fully extended up.
- Time To Complete - Less than 1 hour for an experienced crocheter
Exclusive Printable Crochet Patterns
Be inspired and keep creating!
Join us in The Pattern Vault, Easy Breezy Crochet's exclusive community.
Connect with other crocheters from all around the world and gain access to an extensive library of printable PDF crochet patterns.
All patterns are ad-free and available to you when you want, allowing you to crochet in your own time. So, if you're stuck on inspiration or on the hunt for you next crochet project, the Pattern Vault is for you!
About This Pattern
- This pattern is worked with two strands of worsted-weight yarn, giving the bag structure that adds to its charm. However, you can use other heavier yarn weights to make this crochet pouch.
- We recommend using a stitch marker to mark the first stitch of each round as you go, especially in Round 3, where indicated. This will help you easily identify the start of the next round.
- The base of the bunny is worked in joined rounds, after that it is worked in continuous rounds.

Crochet Stitches
This pattern uses basic crochet stitches like single crochet, chain stitch, half double crochet, double crochet, and slip stitches.
You will also need to know how to work in the front loops and back loops of stitches and how to make a Bobble stitch.
Front Loops (FLO) And Back Loops (BLO)
In this pattern, you will need to know the difference between the front or back loops of stitches. If you are not sure what this means, check out our blog post understanding front and back loops in crochet. It explains everything in a super easy way.
Invisible Decrease (invdec)
In this pattern, you will need to do something called 'invisible decreases. Do not worry if you are not sure how to do it! Check out our post on making a single crochet invisible decrease to learn all about it. It is easy, I promise!
Yarn and Hook Information
To make these crochet bunny pouches we used two strands of worsted-weight yarn with about 11 WPI.
We opted to use two strands of yarn and a 6.5mm hook to create tight stitches to give the pouch added thickness for a better shape and overall look when filled with treats.
What You Will Need
Yarn
#4 medium yarn (worsted, Afghan, Aran, or 10-ply) with 11 WPI (wraps per inch).
- Color A, yellow (body) - 56.8 yards (52 meters) - total needed to work in two strands
- Color B, pink (nose) - 27 inches (70 cm) - total needed to work in two strands
- Color C, black (mouth) - 11 inches (30cm) - embroider mouth using a single strand
Hook
- 6.5 mm
Notions
- Scissors
- Yarn needle
- 2 stitch markers
- Eyes - 12mm safety eyes (or glue on eyes + glue)
Finished Size & Gauge

The finished size of the crochet bunny pouch is about 3 inches (7.6 cm) wide, 3.25 inches (8.3 cm) to the top of the pouch opening, and about 7 inches (18cm) tall to the tip of the ear when fully extended up.
The gauge for this pattern is not so important.
Stitches and Abbreviations Used - US Terms
- ch- chain
- sc-single crochet
- hdc - half double crochet
- dc - double crochet
- BO - bobble stitch
- col - color
- invdec - invisible decrease - see special stitches below
- rnd - round
- rpt - repeat
- sk - skip
- sp - space
- sl st - slip stitch
- st/sts - stitch/stitches
- FLO - front loop only - see special stitches below
- BLO - back loop only - see special stitches below
- YO - yarn over hook
- hk - hook
- lps - loops
- [ ] - at the end of a round, indicates the number of stitches in that round
Special Stitches
- BO - YO, insert hk into specified st, YO pull up lp (3-lps on hk), YO pull through 2-lps (2-lps on hk), YO pull up lp (4-lps on hk), YO pull through 2-lps (3- lps on hk), YO pull up lp (5-lps on hk), YO pull through 2-lps (4- lps on hk), YO pull up lp (6-lps on hk), YO pull through 2-lps (5- lps on hk), YO pull up lp (7-lps on hk), YO pull through 2-lps (6- lps on hk), YO and pull through all lps (1-lp on hook).
- invdec - Insert hk in FLO of next st, then in FLO of next st, YO, pull through 2-lps, YO, pull through 2-lps.
How identify a front and back loop - To find the front loop of a crochet stitch, look for the loop closest to you on top of the stitch. The back loop is the loop furthest from you, located at the back of the stitch.
Pattern Notes
- This pattern is worked with two strands of yarn throughout.
- Use a stitch mark to make the first stitch of each round, and where indicated in the pattern.
Ready to start crocheting?
Download the ad-free printable PDF and keep the pattern at your fingertips - no scrolling, no ads, no distractions. Get yours in our shop.
Pattern Instructions
Foundation
Foundation, color A - chain 3, sl st into the 1st chain to form a ring.
Abbreviated version
Foundation, col A - ch3, sl st into 1st ch to form a ring.
Round One
Round 1 - chain 1 (do not count as a stitch), make 8 single crochet into the ring, slip stitch into the 1st st to join. [8 single crochet in this round]
Abbreviated version
Rnd 1 - ch1 (not counted as a st), 8sc into ring, sl st into 1st st to join. [8sc]
Round Two
Round 2 - chain 1 (do not count as a stitch), make 2 single crochet in the same space as chain 1, then 2 single crochet in each of the next 7 stitches, slip stitch into the 1st st to join. [16 single crochet in this round]
Abbreviated version
Rnd 2 - ch1 (not counted as a st), 2sc in same sp as ch-1, 2sc in next 7-sts, sl st into 1st st to join. [16sc]
Round Three
Round 3 - chain 1 (do not count as a stitch), make 2 single crochet in the same space as chain 1, * 2 single crochet in the next stitch, 1 single crochet in the next, repeat from * 7 times, slip stitch into the FLO of the 1st stitch to join (mark the back loop of this stitch for the next round). [24 single crochet in this round]
Abbreviated version
Rnd 3 - ch1 (not counted as a st), 2sc in same sp as ch-1, * 2sc in next, 1sc in next, rpt from * 7 times, sl st into FLO of 1st st to join (mark the back loop of this st for the next round). [24sc]
Weave in ends
- Weave in the starting yarn tails and trim away the excess.

Round Four
Round 4 - sl st into the FLO (front loops only) of the next 7 stitches, first bunny foot: in FLO (front loops only) of next stitch make (1 single crochet, 1 half double crochet, 1 double crochet, 1 half double crochet, 1 single crochet), then slip stitch into the FLO of the next 7 stitches, second bunny foot: in FLO (front loops only) of next stitch make (1 single crochet, 1 half double crochet, 1 double crochet, 1 half double crochet, 1 single crochet), slip stitch into the FLO (front loops only) of the next 8 stitches, slip stitch into the marked stitch on the marked stitch on round 3 to join. [26 single crochet, 4 half double crochet, 2 double crochet in this round]
Abbreviated version
Rnd 4 - sl st in FLO of next 7-sts, foot 1: in FLO of next st (1sc, 1hdc, 1dc, 1hdc, 1sc), sl st in FLO of next 7-sts, foot 2: in FLO of next st (1sc, 1hdc, 1dc, 1hdc, 1sc), sl st in FLO next 8-sts, sl st into the marked st on rnd 3 to join. [26sc, 4hdc, 2dc]

Round Five
Round 5 - chain 1 (do not count as a stitch), make 1 single crochet in the same space as chain 1, then make 1 single crochet in the BLO (back loops only) of the next 23 stitches. [24 single crochet in this round]
Abbreviated version
Rnd 5 - ch-1 (not counted as a st), 1sc in same sp as ch-1, 1sc in BLO of next 23-sts. [24sc]

Round Six
Round 6 - slip stitch inot the next 2 stitches, chain 1 (do not count as a stitch) 1 single crochet in the same space as chain 1, 1 single crochet in each of the next 22 stitches, make a bobble stitch (BO) in the next. [23 single crochet, 1 bobble stitch in this round]
Abbreviated version
Rnd 6 - sl st into next 2-sts, ch1 (not counted as a st), 1sc in same sp as ch-1, 1sc in next 22-sts, BO in next. [23sc, 1BO]

✨ You're almost there! ✨
To unlock the final steps and complete your pattern, create a free account with Grow.me. below.
Make sure to tick the box to subscribe to our newsletter and stay up to date with the latest patterns, tips, and more!
Once you're signed up, you'll get instant access to finish your project and enjoy exclusive content in the future.
Already signed up? Hit the button below and select 'Switch to Log In' to pick up where you left off and finish your project!
Round Seven
Round 7 - make 1 single crochet in each stitch. [24 single crochet in this round]
Abbreviated version
Rnd 7 - 1sc in each st. [24sc]
Round Eight
Round 8 - make 1 single crochet in the next 11 stitches, drop color A but keep the loop on the hook, bunny nose: pick up color B and work with two strands, insert the hook into the next stitch and pull up a loop, yarn over the hook, insert the hook back into the same stitch, yarn over the hook and pull up a loop, drop color B and pick up color A, yarn over the hook and pull the hook through all the loops, then make 1 single crochet in each of the next 12 stitches. [23 single crochet and nose in this round]
Abbreviated version
Rnd 8 - 1sc in next 11-sts, drop col A (keep lp on hk), nose: pick up col B (work with two strands), insert hk into next st and pull up a lp, YO, insert hk back into same st, YO and pull up a lp, drop col B and pick up col A, YO and pull through all lps on hk, 1sc in each of the next 12-sts. [23sc, nose]

Finish nose and mouth
- Before moving onto the next round, knot the yarn ends of col B to secure in place and trim away the excess.
- Then with a single strand of col C (black) worsted yarn embroider on an upside down "T" for the bunny mouth.
Round Nine
Round 9 - make * 1 single crochet in each of the next 4 stitches, make an invisible decrease, repeat from * 4 times. [20 single crochet in this round]
Abbreviated version
Rnd 9 - *1sc in next 4-sts, invdec, rpt from * 4 times. [20sc]
Round Ten
Round 10 - make * 1 single crochet in the next 3 stitches, then make and invisible decrease, repeat from * 3 times. [16 single crochet in this round]
Abbreviated version
Rnd 10 - *1sc in next 3-sts, invdec, rpt from * 4 times. [16sc]
Round Eleven
Round 11 - make 1 single crochet in the next 4 stitches, first bunny ear: chain 13, make 1 double crochet into the 3rd chain from the hook, then make 1 double crochet into the next 2 stitches, then make 1 half double crochet in each of the next 8 stitches, then make 1 single crochet in the next stitch on the pouch edge, make and invisible decrease, then make 1 single crochet in each of the next 4 stitches, second bunny ear: chain 13, make 1 double crochet in the 3rd chain from the hook, them make 1 double crochet in the next 2 stitches, make 1 half double crochet in the next 8 stitches, skip 2 stitches on the pouch edge (this form a buttonhole), then make 1 single crochet in the next 3 stitches.
Abbreviated version
Rnd 11 - 1sc in next 4-sts, ear 1: ch13, 1dc in 3rd ch from hk, 1dc in next 2-sts, 1hdc in next 8-sts, 1sc in next st on pouch edge, invdec, 1sc in next 4-sts, ear 2: ch13, 1dc in 3rd ch from hk, 1dc in next 2-sts, 1hdc in next 8-sts, sk 2-sts on pouch edge (buttonhole), 1sc in next 3-sts.

Round Twelve
Round 12 - slip stitch into the next 4 stitches, slip stitch into the 1st ear, make 1 single crochet in each of the next 10 stitches on the ear, then make (1 single crochet, chain 3, 1 single crochet) into the turning chain (the top of the ear), then make 1 single crochet in the next 10 stitches down the ear, and slip stitch into the last stitch on the ear, slip stitch into the next 5 stitches along the edge of the pouch, slip stitch into the 1st stitch on the next ear, then make 1 single crochet in each of the next 10 stitches, make (1single crochet, chain 3, 1 single crochet) in the turning chain (top of ear), then make 1 single crochet in each of the next 10 stiches down the ear, slip stitch into the last stitch of the ear, slip stitch into the next 2 stitches on the pouch, cut yarn fasten off and weave in ends.
Abbreviated version
Rnd 12 - sl st into next 4-sts, sl st into the 1st st on the ear, 1sc in next 10-sts of the ear, (1sc, ch3, 1sc) in the turning ch (top of ear), 1sc in next 10-sts down the ear, sl st into last st on ear, s st into next 5-sts along the edge of the pouch, sl st into 1st st of next ear, 1sc in next 10-sts of the ear, (1sc, ch3, 1sc) in the turning ch (top of ear), 1sc in next 10-sts down the ear, sl st into last st on ear, sl st into next 2-sts on the pouch, cut yarn fasten off and weave in ends.

Finishing The Crochet Bunny Pouch

- Position the eyes about 1 row above the nose evenly spacing them apart.
- Fill the pouch with small treats or gifts.
- To close the pouch, slip the right ear into the buttonhole created in round 11 and pull tight.
Don't stop here...
Your next 50 crochet projects are ready inside the Pattern Vault - all printable, ad-free, and ready to download instantly.
Tips
When creating the bobble stitch tail, pull the loops up higher making them slightly looser which will make it easier to pull all the loops through the stitch, and it will also make it easier for you to pull your hook through all the loops to complete the stitch.
Don't add a chain stitch after making the bobble stitch tail. This will increase the stitch count making the pattern incorrect.

Variations/Color Schemes/Ideas:
- Classic White Bunny Pouch - Make a timeless, soft white bunny for a traditional look.
- Pastel Easter Bunny Bag - Use light pinks, blues, or yellows for a fun, festive crochet Easter bunny.
- Rustic Neutral Bunny - Beige, brown, or gray for a farmhouse-inspired bunny pouch.
- Holiday-Themed Bunny - Use red and green for Christmas, or warm oranges for a fall crochet theme.
- Add Personalized Touches - Add buttons, beads, tiny bows, or even crochet appliqués for an extra special touch.
- Mini Favor Baskets - Make a few in different shades for party favors or a DIY gift idea.
Creative Bunny Pouch Projects: Fun Alternatives and Crochet Ideas for Easter
If you're looking for more fun and creative ways to make cute bunny pouches, check out these adorable ideas!
You can make a bunny pouch necklace with felt and simple sewing techniques in this easy-to-follow tutorial.
If sewing is more your style, you can also try creating DIY bunny bags with fabric and ribbon, a perfect project for Easter treats.
And for something extra festive, learn how to sew a carrot treat bag for your Easter celebrations with this simple guide.
Also, if you're interested in more easy crochet projects, don't miss our crochet peeps bunny pattern, this bunny drawstring crochet bag, or crochet Easter eggs, perfect for adding a handmade touch to your holiday decorations!
More Easter Crochet Patterns


Quick Crochet Reference Guide
Not sure which hook to pair with your yarn? This free yarn weight & hook size chart makes it easy, with clear guides for:
- Yarn weights and recommended hook sizes
- Conversions between US, UK, and metric sizes
- Quick references for common projects with each yarn weight
Download your free Yarn Weight & Hook Size Chart (printable PDF)
Print it, save it on your phone, or keep it right next to you while crocheting.
Related Guides
- Find seasonal ideas in our seasonal crochet projects hub.
- Find more quick makes in our crochet gifts and small projects hub.
Stay Connected
Pin this post - Pin now to and take your skills to the next level.
Leave a comment - We're excited to hear your thoughts! Leave a comment below and let us know what you think.
Share on Instagram or Facebook - Capture the beauty of your finished crochet projects and share it on Instagram or Facebook! Tag us @easybreezycrochet or #ebcrochetcreations so we can see your work!
Copyright Notice - This pattern and its contents are protected by copyright law. It may not be copied, altered, redistributed, resold, translated, or used to produce video tutorials in any format, either in whole or in part.
You are permitted to sell finished items made using this pattern. However, the written pattern itself may not be sold, shared, or distributed in any form. When marketing or displaying your finished items, please photograph your own work and refrain from using any of my original images.
Sharing Guidelines For Roundups - Bloggers you are welcome to include this pattern in roundup posts, as long as you use one photo and link directly back to the original post. For full details, please refer to my Terms of Use page.
Comments
No Comments