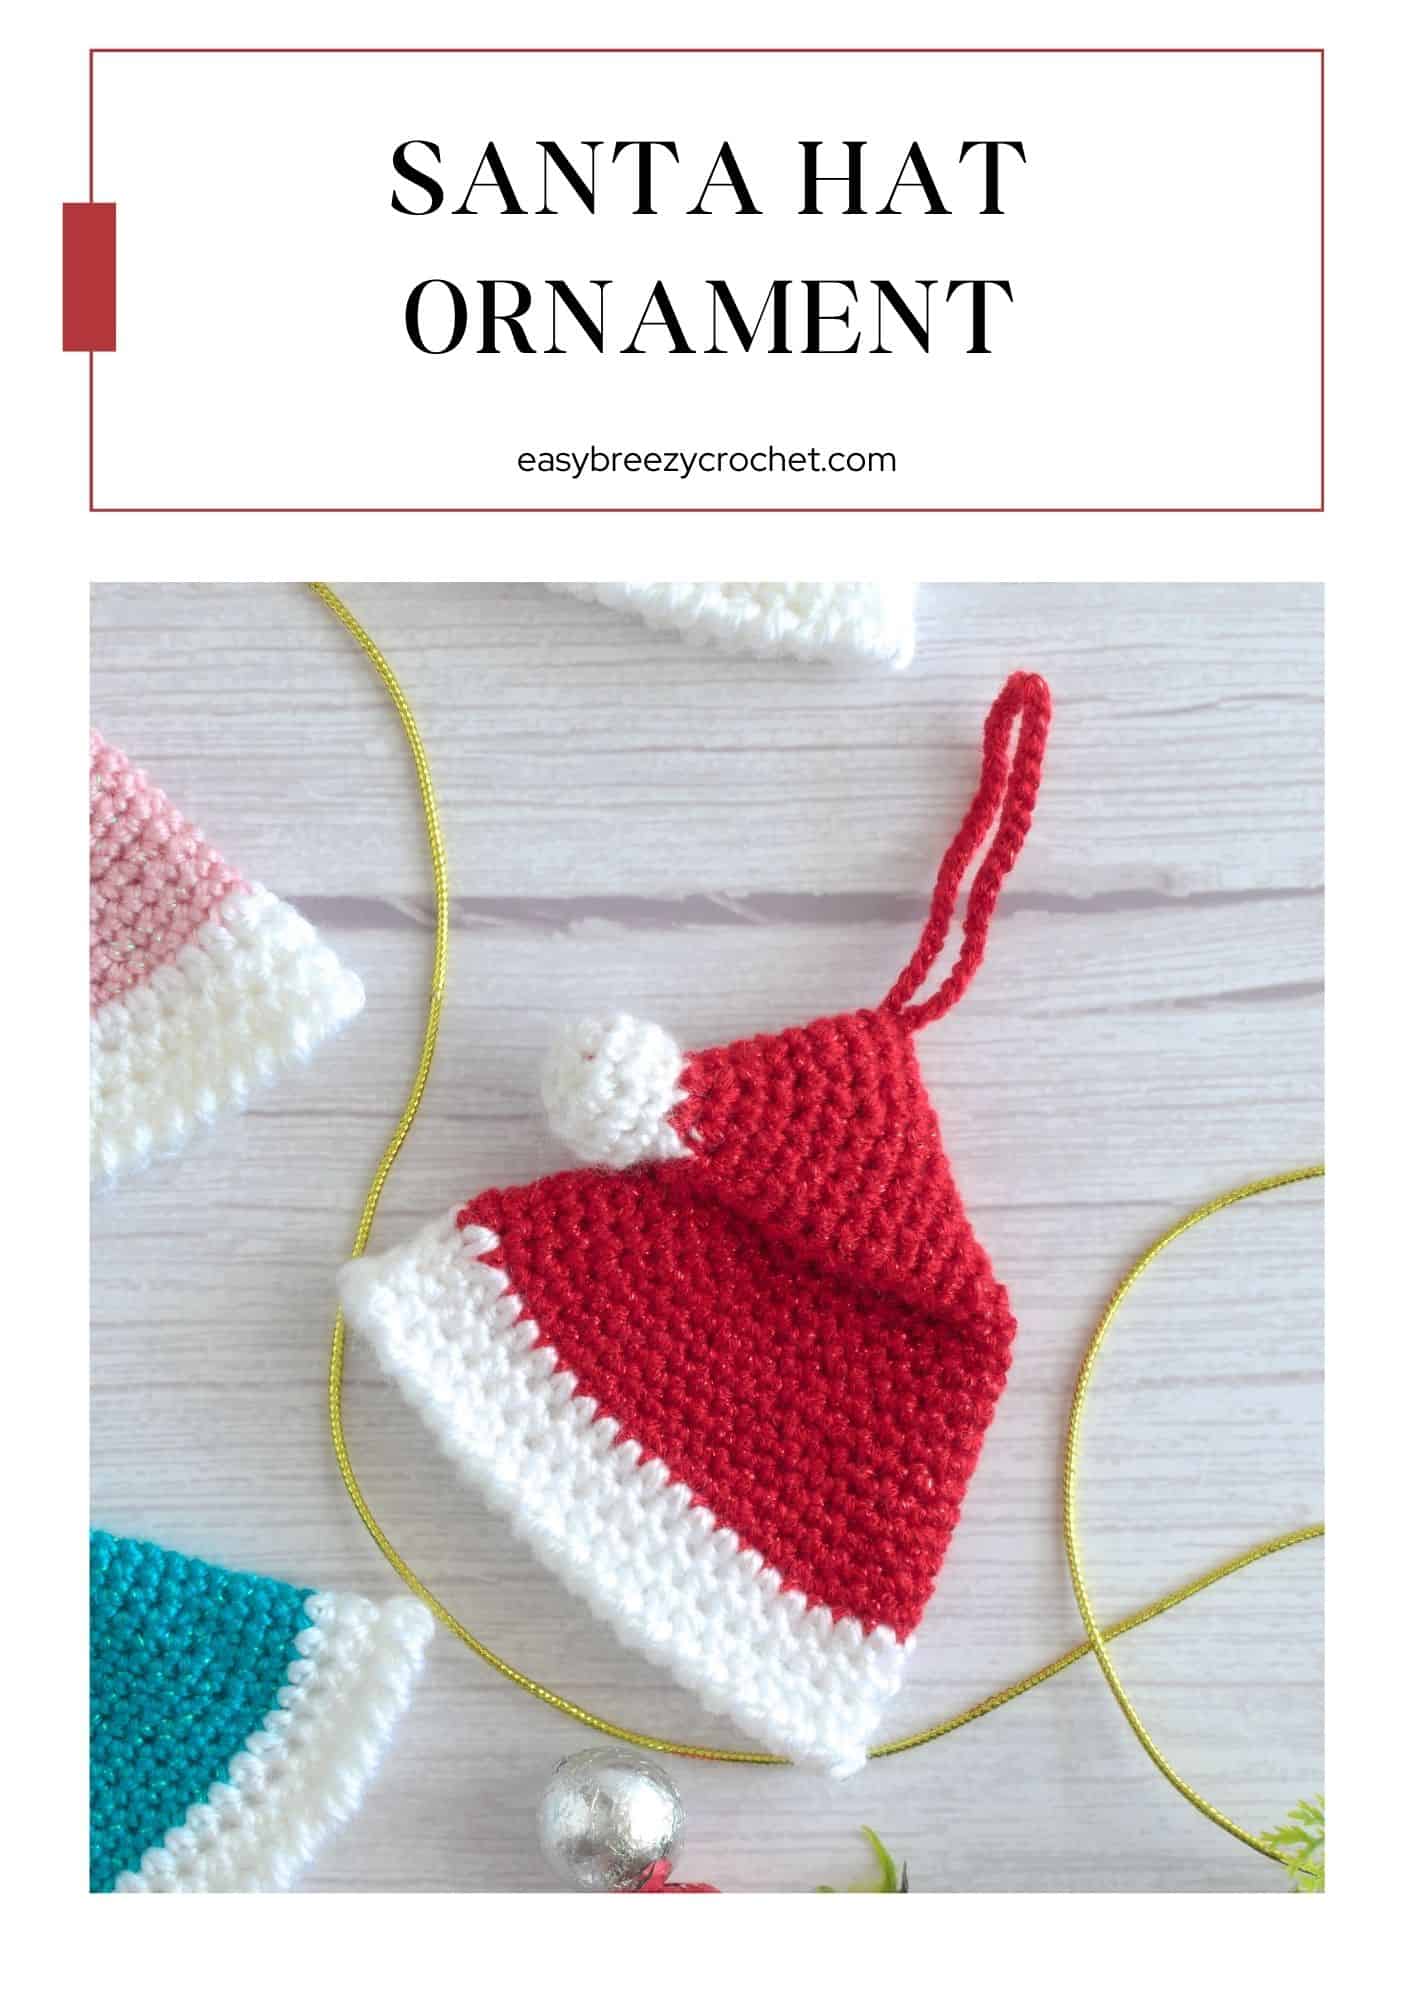
This pattern for an easy crochet Santa hat ornament is fun to make. These little amigurumi Christmas decorations are quick to make and would make a great addition to your handmade ornaments collection.

Table of contents
- About This Crochet Santa Hat Pattern
- What Yarn To Use
- Crochet Hook Sizes
- Stitches Used In This Pattern
- Reverse Single Crochet (RSC)
- Skill Level
- What You Will Need
- Finished Size
- Printable Pattern
- Gauge
- Stitches and Abbreviations Used - US Terms
- Pattern Notes
- Pattern Instructions
- Finishing
- Christmas
- More Free Crochet Patterns
- Stay Connected
- Learn To Crochet
- Comments
Search Our Patterns By Category
About This Crochet Santa Hat Pattern
- This pattern is worked as one piece from the top down (just like our crochet Christmas bells) to the brim and finished with a crocheted hanging loop.
- This pattern does have yarn color changes at the end of the pompom round and the start of the brim.
- If you are new to crocheting small items the hardest (or fiddliest part) is the pompom but after that, it gets easier.
- The only sewing required in this pattern is to tack down the hat and weave in the ends to finish it off.
- These look great in bright fun colors and would make lovely Christmas gifts, or use them as fun gift tags.
What Yarn To Use
For these crochet mini Santa hats, we used two different yarn brands, both being a #3 light worsted weight yarn (also known as DK or 8ply).
The white yarn is 100% acrylic with a recommended 4 mm hook size and a colored glitter yarn with a recommended needle size of 4.5mm.
The colored yarn's composition is an acrylic polyester blend with a glitter thread spun in, which is perfect for making crochet Christmas tree decorations like this hat pattern, or these crochet Christmas bells (coming soon), or this mini crochet Christmas stocking (coming soon).
When crocheted with a smaller hook, these yarns make a tight fabric that holds its shape which is what we wanted for this crochet Santa hat ornament.
However, feel free to use whatever yarn weight, composition, and hook size you like, to get the type of look you are after for your Christmas ornament.
Crochet Hook Sizes
For this easy Santa hat pattern, we used smaller hook sizes than recommended to get a tight stitched fabric.
After making several test pieces, we settled on a 3.75 mm (E/5) hook for the hat ornament and changed to a 2.5 mm (C/2) hook for the hanging loop.
The reason we chose an even smaller hook size for the hanging loop is that when crocheted with the 3.75 mm (E/5) hook the hanging loop just seemed too chunky and did not fit the overall look of the hat.
Stitches Used In This Pattern
For this pattern, you will need to know some basic stitches like how to make chain stitches (ch), single crochets (sc), half double crochet (hdc), and slip stitch (sl st).
Reverse Single Crochet (RSC)
In this pattern, you will be using a technique called 'reverse single crochet,' it adds a lovely decorative edge to your items.
If you are not familiar with it, no worries! Head over to our post on how to make a reverse single crochet to get the hang of it.
It is simple and adds a fun twist to your crochet projects!
Skill Level
Intermediate beginner
What You Will Need
#2 fine (sport, baby, 5ply) yarn with about 18 wraps per inch
- Color A (hat) - 25.60 yards (23.4 meters)
- Color B (pompom and band) - 21 yards (9.2 meters)
Crochet Hook
- 3.75 mm (E/5) hook
- 2.5 mm (C/2) hook to make the hanging loop
Notions
- Scissors
- Yarn needle
- Small amount for toy stuffing for pompom
Finished Size

The finished hat is 3 inches (8 cm) high (does not include the hanging loop) and 4 inches (10 cm) at its widest point.
Printable Pattern
Want an ad-free printable version of this crochet pattern?
Join the Easy Breezy Crochet Pattern Vault to get this printable pattern (and more)!
The Pattern Vault is Easy Breezy Crochet's newest exclusive community where you can access a growing library of ad-free printable crochet patterns, and join a community of crocheters around the world.

Gauge
The gauge is not so important for this pattern.
Stitches and Abbreviations Used - US Terms
- Ch - chain
- FLO - front loop only
- Hdc- half double crochet
- Hk - hook
- Invdec - invisible decrease - see special stitches below
- Lp/lps - loop/loops
- MR - magic ring
- Rnd - round
- Rpt - repeat
- RSC - reverse single crochet - see special stitches below
- Sc - single crochet
- St/sts - stitch/stitches
- YO - yarn over
- [ ] - at the end of a round indicates the number of stitches in that round
Special Stitches
invdec - Insert hk in FLO of next st, then in FLO of next st, YO, pull through 2-lps, YO, pull through 2-lps.
RSC - Insert hk from front to back of next st to the right of the hk, YO pull yarn through st, YO pull yarn though both loops on hk.
Copyright Notice - This pattern and its contents are protected by copyright law. It may not be copied, altered, redistributed, resold, translated, or used to produce video tutorials in any format, either in whole or in part.
You are permitted to sell finished items made using this pattern. However, the written pattern itself may not be sold, shared, or distributed in any form. When marketing or displaying your finished items, please photograph your own work and refrain from using any of my original images.
Sharing Guidelines For Roundups - Bloggers you are welcome to include this pattern in roundup posts, as long as you use one photo and link directly back to the original post. For full details, please refer to my Terms of Use page.
Pattern Notes
- Most of this pattern is crocheted in a spiral, so do not join the rounds, until you get to the hat brim.
- Use a stitch marker to make the first stitch of each round as you go.
Pattern Instructions

Pompom - Round One
Round 1, color B (pompom) - Make 6 single crochet into a magic ring. [6 single crochets in this round.]
Abbreviated version
Rnd 1, color B (pompom) - 6sc into MR. [6sc]
Round Two
Round 2 - Make 2 single crochet into each stitch. [You should have 12 single crochets in this round.]
Abbreviated version
Rnd 2 - Make 2sc into each st. [12sc]
Rounds Three - Four
Rounds 3-4 - Make 1 single crochet into each stitch. [There should be 12 single crochet in each round.]
Abbreviated version
Rnds 3-4 - 1sc in each st. [12sc in each rnd]
Round Five
Round 5 - (Make an invisible decrease) repeat the instructions in the brackets 6 times, cut yarn, but do not fasten off. [You should have 6 single crochets in this round.]
Abbreviated version
Rnd 5 - (Invdec) rpt 6 times, cut yarn, but do not fasten off. [6sc]
✨ You're almost there! ✨
To unlock the final steps and complete your pattern, create a free account with Grow.me. below.
Make sure to tick the box to subscribe to our newsletter and stay up to date with the latest patterns, tips, and more!
Once you're signed up, you'll get instant access to finish your project and enjoy exclusive content in the future.
Already signed up? Hit the button below and select 'Switch to Log In' to pick up where you left off and finish your project!
Round Seven
Round 7 - Make 1 single crochet into each stitch. [9 single crochets in this stitch.]
Abbreviated version
Rnd 7 - 1sc in each st. [9sc]
Round Eight
Round 8 - Make 2 single crochets in the next stitch, then 1 single crochet in each of the next 2 stitches, then 1 single crochet in each of the next 2 stitches) repeat the instructions in the brackets 3 times. [12 single crochets in this round.]
Abbreviated version
Rnd 8 - (2sc in next st, 1sc in next 2-sts) rpt 3 times. [12sc]
Round Nine
Round 9 - Make 1 single crochet in each stitch. [12 single crochets in this round.]
Abbreviated version
Rnd 9 - 1sc in each st. [12sc]
Round Ten
Round 10 - (make 2 single crochets in the next stitch, then make 1 single crochet in each of the next 3 stitches) repeat the instructions in the brackets 3 times. [15 single crochets in this round.]
Abbreviated version
Rnd 10 - (2sc in next st, 1sc in next 3-sts) rpt 3 times. [15sc]
Round Eleven
Round 11 - Make 1 single crochet in each stitch. [15 single crochets in this round.]
Abbreviated version
Rnd 11 - 1sc in each st. [15sc]
Round Twelve
Round 12 - (Make 2 single crochets in the next stitch, then 1 single crochet in each of the next 4 stitches) repeat the instructions in the brackets 3 times. [You should have 18 single crochets in this round.]
Abbreviated version
Rnd 12 - (2sc in next st, 1sc in next 4-sts) rpt 3 times. [18sc]

Rounds Thirteen and Fourteen
Rounds 13-14 - Make 1 single crochet in each stitch. [18 single crochets in each round.]
Abbreviated version
Rnds 13-14 - 1sc in each st. [18sc in each rnd]
Round Fifteen
Round 15 - (Make 2 single crochets in the next stitch, then 1 single crochet in each of the next 5 stitches) repeat the instructions in the brackets 3 times. [21 single crochets in this round.]
Abbreviated version
Rnd 15 - (2sc in next st, sc in next 5-sts) rpt 3 times. [21sc]
Rounds Sixteen and Seventeen
Rounds 16-17 - 1 single crochet in each stitch. [21 single crochets in each round.]
Abbreviated version
Rnds 16-17 - 1sc in each st. [21sc]
Round Eighteen
Round 18 - (Make 2 single crochets in the next stitch, then 1 single crochet in each of the next 6 stitches) repeat the instructions in the brackets 3 times. [24 single crochets in this round.]
Abbreviated version
Rnd 18 - (2sc in next st, 1sc in next 6-sts), rpt 3 times. [24sc]
Round Nineteen
Round 19 - 1 single crochet in each stitch. [24 single crochets in each round.]
Abbreviated version
Rnd 19 - 1sc in each st. [24sc]
Round Twenty
Round 20 - (Make 2 single crochets in the next stitch, then 1 single crochet in each of the next 7 stitches) repeat the instructions in the brackets 3 times. [27 single crochets in this round.]
Abbreviated version
Rnd 20 - (2sc in next st, 1sc in next 7-sts) rpt 3 times. [27sc]
Round Twenty One
Round 21 - 1 single crochet in each stitch. [27 single crochets in this round.]
Abbreviated version
Rnd 21 - 1sc in each st. [27sc]
Round Twenty Two
Round 22 - (Make 2 single crochets in the next stitch, then 1 single crochet in each of the next 8 stitches) repeat the instructions in the brackets 3 times. [30 single crochets in this round.]
Abbreviated version
Rnd 22 - (2sc in next st, 1sc in next 8-sts) rpt 3 times. [30sc]
Round Twenty Three
Round 23 - 1 single crochet in each stitch. [30 single crochets in this round.]
Abbreviated version
Rnd 23 - 1sc in each st. [30sc]
Round Twenty Four
Round 24 - (Make 2 single crochets in the next stitch, then 1 single crochet in each of the next 9 stitches) repeat the instructions in the brackets 3 times. [33 single crochets in this round.]
Abbreviated version
Rnd 24 - (2sc in next st, 1sc in next 9-sts) rpt 3 times. [33sc]
Round Twenty Five
Round 25 - 1 single crochet in each stitch. [33 single crochets in each round.]
Abbreviated version
Rnd 25 - 1sc in each st. [33sc]
Round Twenty Six
Round 26 - (Make 2 single crochets in the next stitch, then 1 single crochet in each of the next 10 stitches) repeat the instructions in the brackets 3 times. [36 single crochets in this round.]
Abbreviated version
Rnd 26 - (2sc in next st, 1sc in next 10-sts) rpt 3 times. [36sc]
Round Twenty Seven
Round 27 - 1 single crochet in each stitch. [36 single crochets in each round.]
Abbreviated version
Rnd 27 - 1sc in each st. [36sc]
Round Twenty Eight
Round 28 - (Make 2 single crochets in the next stitch, then 1 single crochet in each of the next 11 stitches) repeat the instructions in the brackets 3 times. [39 single crochets in this round.]
Abbreviated version
Rnd 28 - (2sc in next st, sc in next 11-sts), rpt 3 times. [39sc]
Round Twenty Nine
Round 29 - 1 single crochet in each stitch. [39 single crochets in each round.]
Abbreviated version
Rnd 29 - 1sc in each st. [39sc]
Round Thirty
Round 30 - (Make 2 single crochets in the next stitch, then 1 single crochet in each of the next 12 stitches) repeat the instructions in the brackets 3 times. [42 single crochets in this round.]
Abbreviated version
Rnd 30 - (2sc in next st, c in next 12-sts) rpt 3 times. [42sc]
Round Thirty One
Round 31 - Make 1 single crochet in each stitch, then slip stitch into the next 2 stitches of the next round. [42 single crochets in this round.]
Abbreviated version
Rnd 31 - 1sc in each st, then sl st into the 1st 2-sts of the next round. [42sc]
Cut yarn and leave yarn tail about 1 yard (1 meter) long, to be used later for sewing and making a hanging chain.
Roll the yarn tail into a small bundle and tuck it inside the hat for later.

Hat Band - Rounds Thirty Two - Thirty Four
Round 32-34, color B (band) - Chain 2 (this is not counted as a stitch), make 1 half double crochet in the same space as chain 2, half double crochet in the next 41 stitches, slip stitch into the top of the 1st stitch to join. [42 half-double crochets in each round.]
Abbreviated version
Rnd 32-34, color B (band) - Ch2 (not a st), hdc in same sp as ch-2, hdc in next 41-sts, sl st into 1st st to join. [42hdc in each rnd]
Round Thirty Five
Round 35 - Chain 1, reverse single crochet into each stitch, reverse single crochet into the 1st made to join the round, cut yarn, and leave a long rail for about 20 inches (50 cm) for attaching and fastening off.
Abbreviated version
Rnd 35 - Ch1, RSC into each st, RSC back into 1st to join the round. cut yarn, leave a long tail of about 20 inches (50cm) for attaching, and fasten off, and weave in the white tail yarn ends.
Finishing

Step 1
- Flatten the hat, so that the white tail end in on the left fold line.
- Thread the main yarn color yarn tail onto a needle.
- Count 7 rows of the main color up from the top of the white band, and push the needle and yarn through from the inside to the outside on the left fold line.

Step Two
- Fold down the top of the hat, so that the inner edge of the pompom base (where the yarn colors change) meets the point where the yarn has been pulled out.

Step Three
- Make two or three small back stitches to secure the base of the pompom to the left fold line of the hat.

Step Four
- Insert the needle and yarn back inside the hat, then push the needle through the peaked fold line at the top of the hat on the left-hand side, pull all the yarn through, and remove the needle.

Step Five
- Slip a 2.5 mm crochet hook up and under the stitch directly under where the yarn sits, yarn over the hook, pull through a loop, chain 40 (or as many chains as required to get the hanging loop size you want), and fasten off, but do not cut the yarn tail.

Step Six
- Thread the yarn tail back onto the needle and insert it back into the Santa hat, weave in the end to secure it, and cut off excess yarn.
Christmas
- Crochet Mini Stocking
- Easy Crochet Christmas Granny Squares For Beginners
- Easy Crochet Angel Ornament
- Crochet Christmas Star Ornament
More Free Crochet Patterns
If you like the simple easy Christmas crochet ornament you might also like this pattern for a crochet mini wreath, these small granny stitch crochet stars, this crochet Christmas tree coaster pattern, these crochet penguin Christmas ornaments, Angelica the crochet angel, these snowman candy cane holder or these other easy crochet ideas:

Stay Connected
Pin this post - Pin now to and take your skills to the next level.
Leave a comment - We're excited to hear your thoughts! Leave a comment below and let us know what you think.
Share on Instagram or Facebook - Capture the beauty of your finished crochet projects and share it on Instagram or Facebook! Tag us @easybreezycrochet or #ebcrochetcreations so we can see your work!
Learn To Crochet
If you are new to crochet and would like to learn more. You might like these:


Comments
No Comments