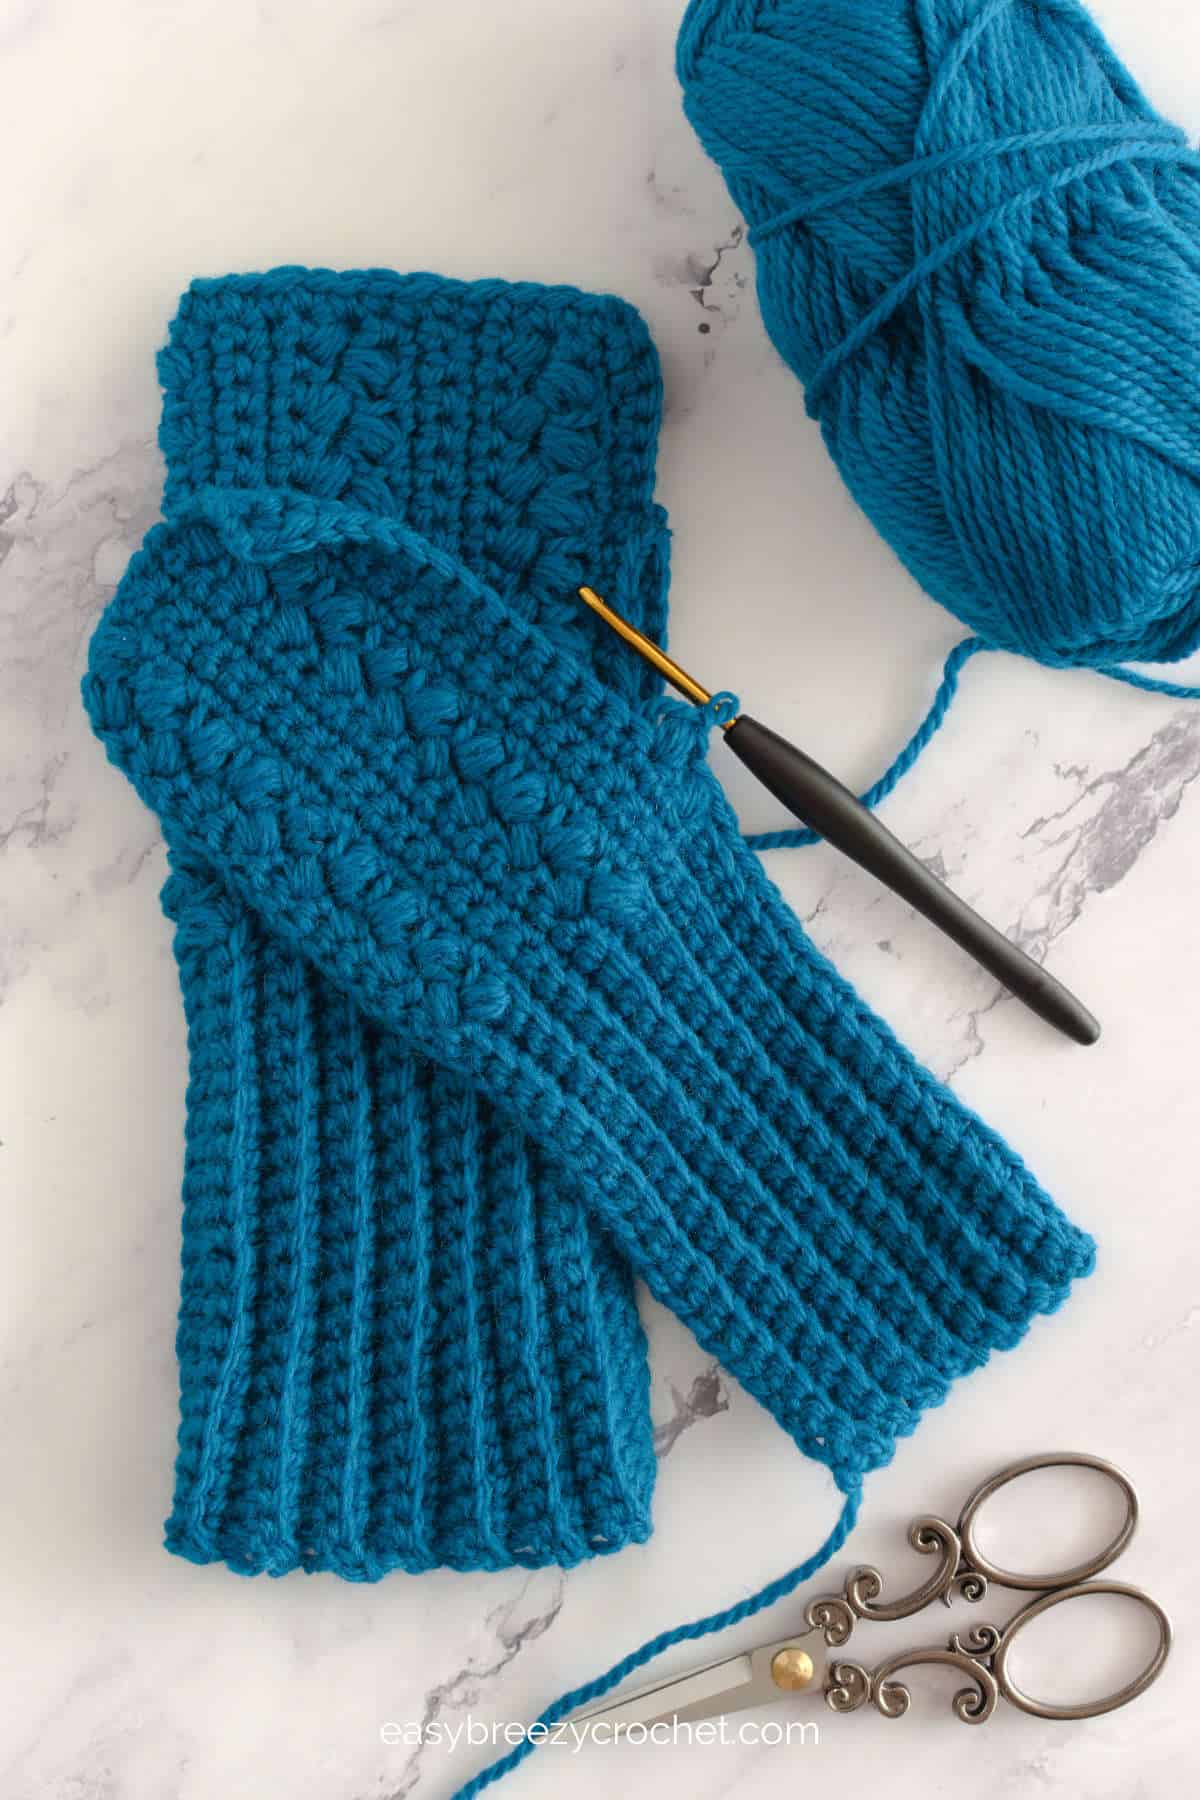
Today we bring you an easy long fingerless gloves crochet pattern, which is perfect for beginners and seasoned makers alike.
Whether you're sipping your favorite hot beverage on a cold winter's day or strolling through autumn leaves, these gloves will keep your hands cozy while adding a touch of elegance to your outfit.

Looking for more crochet wearables? Browse our crochet accessories patterns for scarves, hats, and beginner-friendly projects you can make next.
Table of contents
In this pattern, you will be using a simple combination of single crochet stitches and puff stitches.
Don't worry if you're new to crocheting - we've designed this pattern with beginners in mind, guiding you through each step with clear and simple instructions.
The highlight of these gloves is the long ribbed cuff that can be folded over for extra warmth and style.
Feel free to get creative with your yarn choices! While we've used soft wool yarn, you can easily substitute it with any #3 light yarn in your favorite colors.
Exclusive Printable Crochet Patterns
Be inspired and keep creating!
Join us in The Pattern Vault, Easy Breezy Crochet's exclusive community.
Connect with other crocheters from all around the world and gain access to an extensive library of printable PDF crochet patterns.
All patterns are ad-free and available to you when you want, allowing you to crochet in your own time. So, if you're stuck on inspiration or on the hunt for you next crochet project, the Pattern Vault is for you!
About These Crochet Fingerless Gloves
- This pattern uses basic crochet stitches and a simple puff stitch.
- It features a ribbed cuff that is easy to make with single crochet stitches worked in the back loop (BL).
- This pattern for long fingerless gloves is worked lengthwise and can easily be adjusted to suit different hand sizes.
- I used 100% wool yarn, but you can substitute it with any other yarn.
- The cuff has been made long and can act as wrist warmers when folded over.
- If you prefer extra-long fingerless gloves, the foundation chain can be increased to your desired length - see our pattern adjustment notes below for more details.
- If you like these finglerless gloves you might also be interested in these crochet fingerless glove patterns.
Yarn Use For These Gloves
I used pure wool yarn, #3 light (light worsted, DK, 8ply) yarn, but you could use other yarns with similar yarn weight.
Pattern Adjustments
Width
This pattern is for a lady's medium size glove with a 7 inch (17.5cm) hand circumference around the knuckles.
The width can easily be increased or decreased by adjusting the number of rows made.
For example, 28 rows of this pattern equal 7 inches (17.5cm) long. If you wanted a smaller or larger width, decrease or increase the number of rows to get your required circumference.
Length
These gloves are about 10 inches (26cm) long if you would like a longer sleeve on the gloves, increase the number of foundation stitches.
The pattern starts with a foundation of 39 stitches and this makes a 10-inch (26cm) long glove.
You can increase the length by adding extra chains in multiples of 2 until you get your desired length.
When working the pattern, include these extra stitches with the 20 single crochet stitches that are worked into the back loop (BL), this will increase the length of the ribbed sleeve, without altering the length and pattern over the hand.
Crochet Stitches
For this pattern you will need to know a few basic crochet stitches, like chain stitch, single crochet, and slip stitch.
Crochet Puff Stitch
Improve your crochet game with the fun Crochet Puff Stitch! This pattern needs you to be know how to make this stitch. If you are not sure how to do it, check out our guide on making a crochet puff stitch.
Front Loops (FLO) And Back Loops (BLO)
In this pattern, you will need to know the difference between the front or back loops of stitches. If you are not sure what this means, check out our blog post understanding front and back loops in crochet. It explains everything in a super easy way.
Skill Level
Intermediate Beginner
What You Will Need
#3 Light (light worsted, DK, 8 ply) 100% wool yarn or similar
- You will need about 140 yards (128 meters) for a pair.
Crochet Hook
- 4mm (G-6) or a crochet hook size to obtain the correct gauge.
Notions
- Scissors
- Yarn needle
Finished Size

These fingerless gloves are about 3.5 inches (9cm) wide and 10 inches (26cm) long, which is similar to a medium-sized ladies' glove.
Gauge
16 single crochets and 17 rows = 4 x 4 inches (10 x 10 cm) square using a 4 mm (G-6) hook.
Check your gauge: Use any hook size to obtain the correct gauge.
Stitches and Abbreviations Used - US Terms
- ch - chain
- sc - single crochet
- BL - back of loop
- PUFF - see special stitches below
- hk - hook
- st/sts - stitch/stitches
- sk - skip
- rpt - repeat
- YO - yarn over
Pattern Notes
Pattern Adjustment: This pattern is for a lady's medium size glove with a 7 inch (17.5cm) hand circumference around the knuckles.
The width can easily be increased or decreased by adjusting the number of rows made.
For example, 28 rows of this pattern is about 7 inches (17.5cm) long. If you wanted a smaller or larger width, decrease or increase the number of rows to get your required circumference.
Pattern Instructions
Foundation - Chain 39.
Abbreviated version
Foundation - Ch39.
Row One

Row 1 - Make 1 single crochet in the 2nd chain from the hook, then single crochet in each stitch to the end, and turn. [38 single crochets in this row]
Abbreviated version
Row 1 - 1sc in 2nd ch from hk, sc in each st to the end, turn. [38sc]
✨ You're almost there! ✨
To unlock the final steps and complete your pattern, create a free account with Grow.me. below.
Make sure to tick the box to subscribe to our newsletter and stay up to date with the latest patterns, tips, and more!
Once you're signed up, you'll get instant access to finish your project and enjoy exclusive content in the future.
Already signed up? Hit the button below and select 'Switch to Log In' to pick up where you left off and finish your project!
Row Two
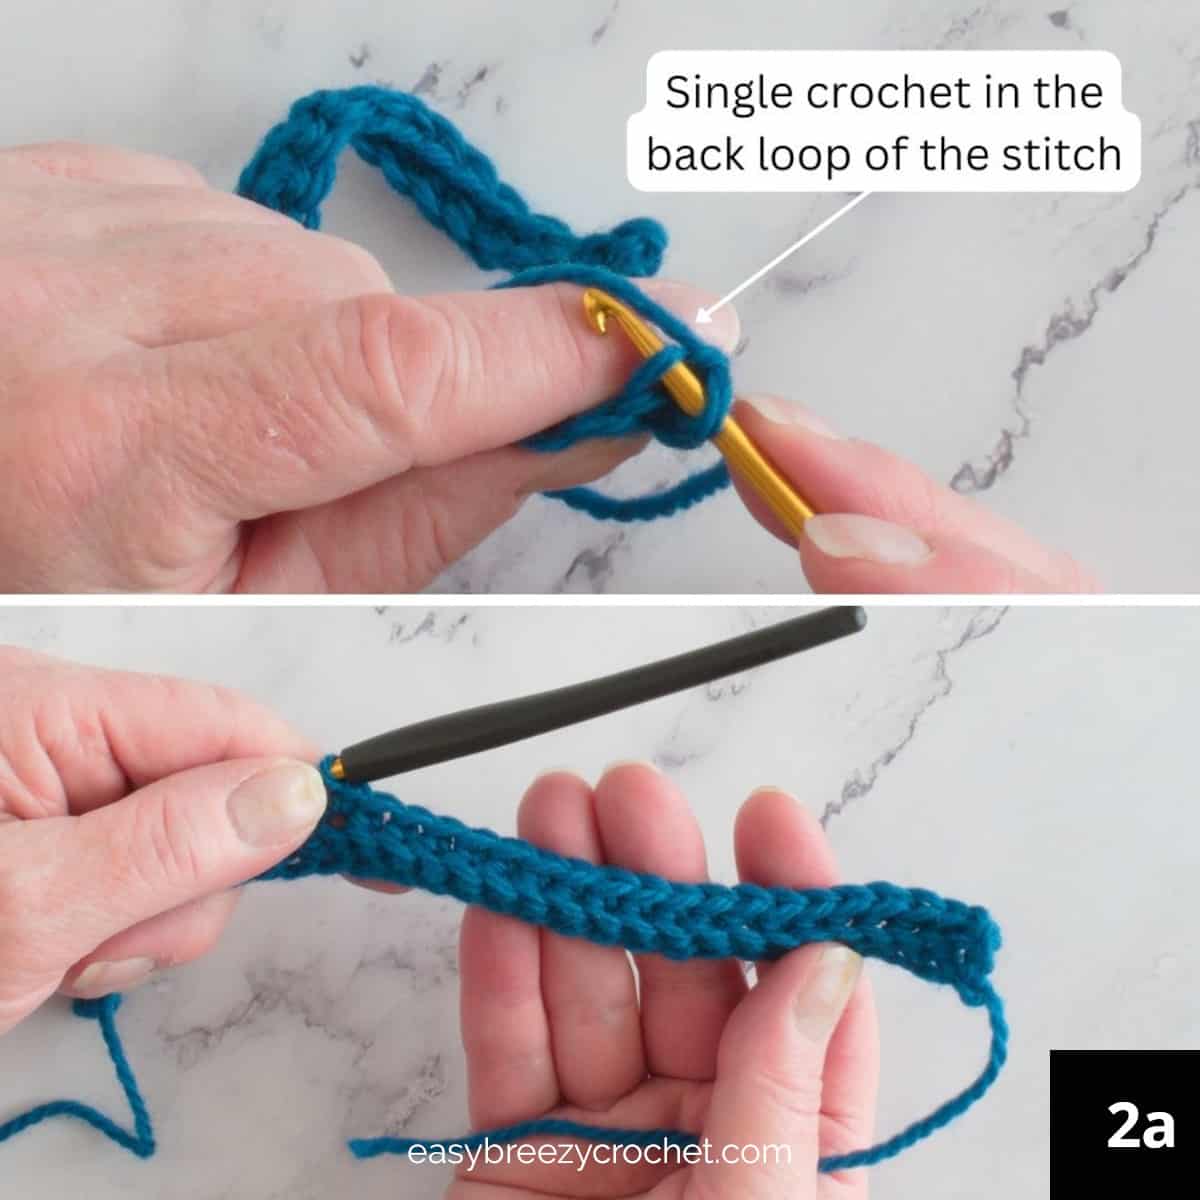
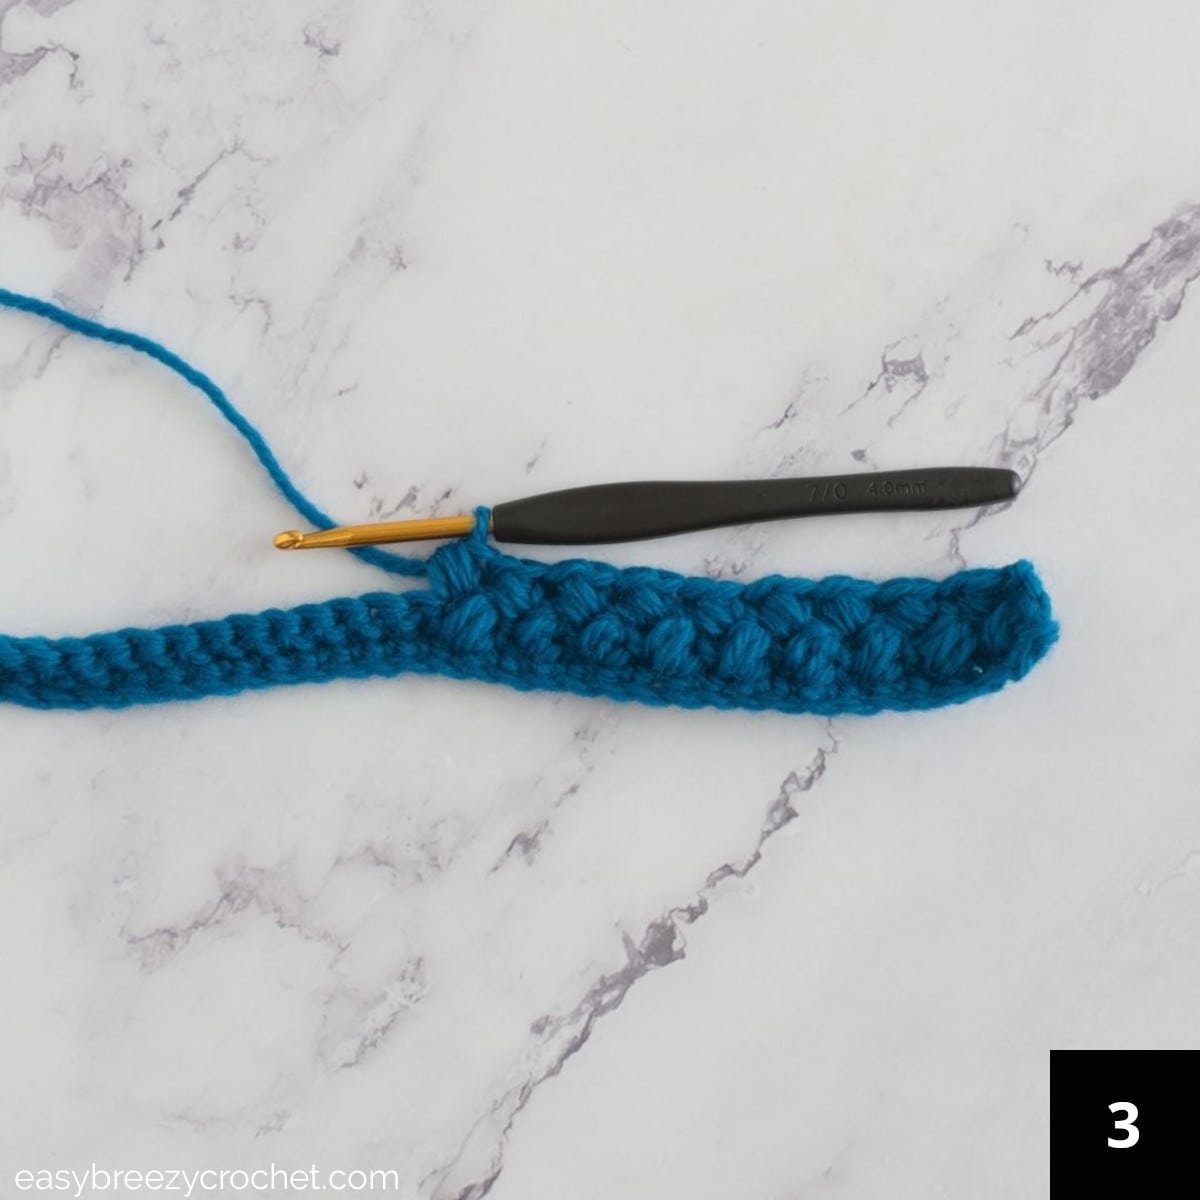
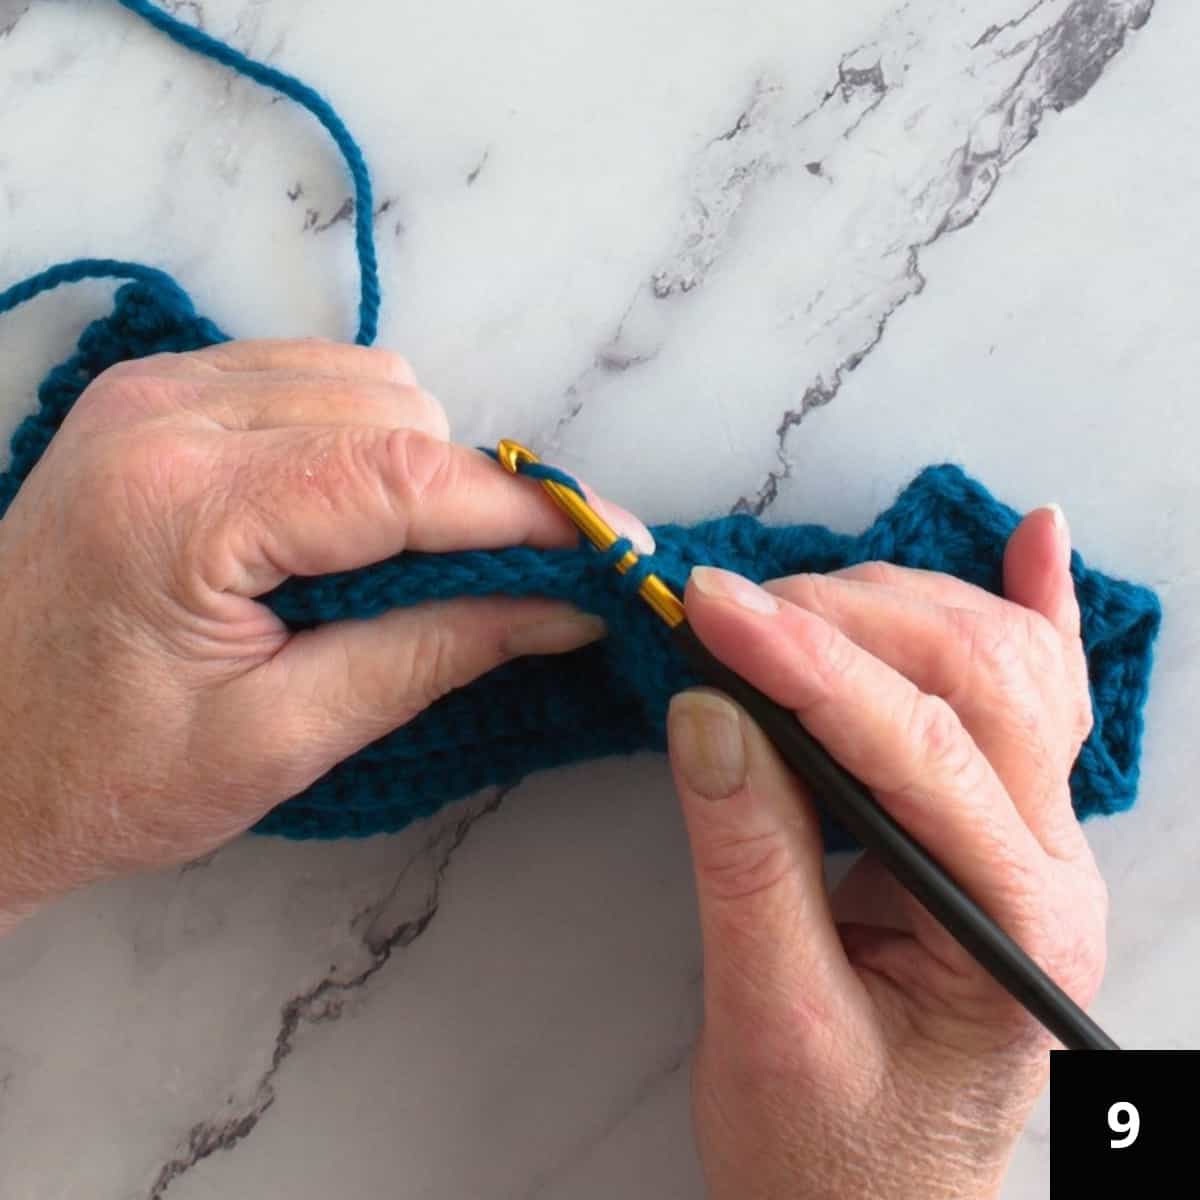
Row 2 - Chain 1 (this is not counted as a stitch), make 1 single crochet into the back loop of the next 20 stitches, then make a PUFF in the next stitch, * chain 1, skip 1 stitch, PUFF in the next stitch, repeat from * 7 more times (to make a total of 9 PUFFS), single crochet into the last stitch, turn.
[38 stitches in this row]

Abbreviated version
Row 2 - Ch1 (not counted as a st), 1sc into the BL of next 20-sts, PUFF in the next st, * ch1, sk-1 st, PUFF in next st, rpt from * 7 more times (to make a total of 9 PUFFS), sc in last st, turn. [38sts]
Row Three
Row 3 - Chain 1 (this is not counted as a stitch), single crochet into next space, PUFF into PUFF, * chain 1, PUFF into PUFF, repeat from * 7 more times, single crochet in the back loop only of each of the next 20 stitches, turn. [38 stitches in this row]
Abbreviated version
Row 3 - Ch1 (not counted as a st), sc into next sp, PUFF into PUFF, * ch1, PUFF into PUFF, rpt from * 7 more times, sc in BL of each of the next 20 st, turn. [38sts]
Row Four
Row 4 - Chain 1 (this is not counted as a stitch), 1 single crochet into the back loop of the next 20 stitches, then single crochet into puff, * single crochet into the chain 1 space, single crochet into puff, repeat from * to the end of the row ending with a single crochet in the last stitch.
[38 single crochets in this row]
Abbreviated version
Row 4 - Ch1 (not counted as a st), 1sc into BL of the next 20-sts, then sc into puff, * sc into the ch-1 sp, sc into puff, repeat from * to the end of the row ending with a sc in the last st, turn. [38sc]
Row Five
Row 5 - Chain 1 (this is not counted as a stitch), 1 single crochet in each of the next 18 stitches, 1 single crochet into the back loop of the next 20 stitches, and turn. [38 single crochets in this row]
Abbreviated version
Row 5 - Ch1 (is not counted as a st), 1sc in next 18-sts, 1sc into BL next 20-sts, turn. [38sc]
Row Six
Row 6 - Chain 1 (this is not counted as a stitch). 1 single crochet into the back loop of the next 20 stitches, then 1 single crochet in each of the next 18 stitches, and turn. [38 single crochets in this row]
Abbreviated version
Row 6 - Ch1 (is not counted as a st), 1sc into BL next 20-sts, 1sc in next 18-sts, turn. [38sc]
Row Seven

Row 7 - Chain 1 (this is not counted as a stitch), 1 single crochet in each of the next 18 stitches, 1 single crochet into the back loop of the next 20 stitches, and turn. [38 single crochets in this row]
Abbreviated version
Row 7 - Ch1 (is not counted as a st), 1sc in next 18-sts, 1sc into BL next 20-sts, turn. [38sc]
Repeat rows 2 - 7 until you have made a total of 28 rows, do not turn work after the last row.
Row Twenty Nine

Row 29 (work along the edge of the rows) - 1sc into the same space as the last single crochet made in row 28, then evenly work 28 single crochets along the edge of the rows until you come to the end. Do not cut yarn.
Seaming the glove and making the thumb hole

Fold the glove in half lengthwise with the wrong sides facing and matching the stitches down both sides.
Joining the side seam above the thumb

Working down the length of the glove, match the corresponding stitches down the side, and make 1 single crochet into each of the next 7 stitches to join the two.
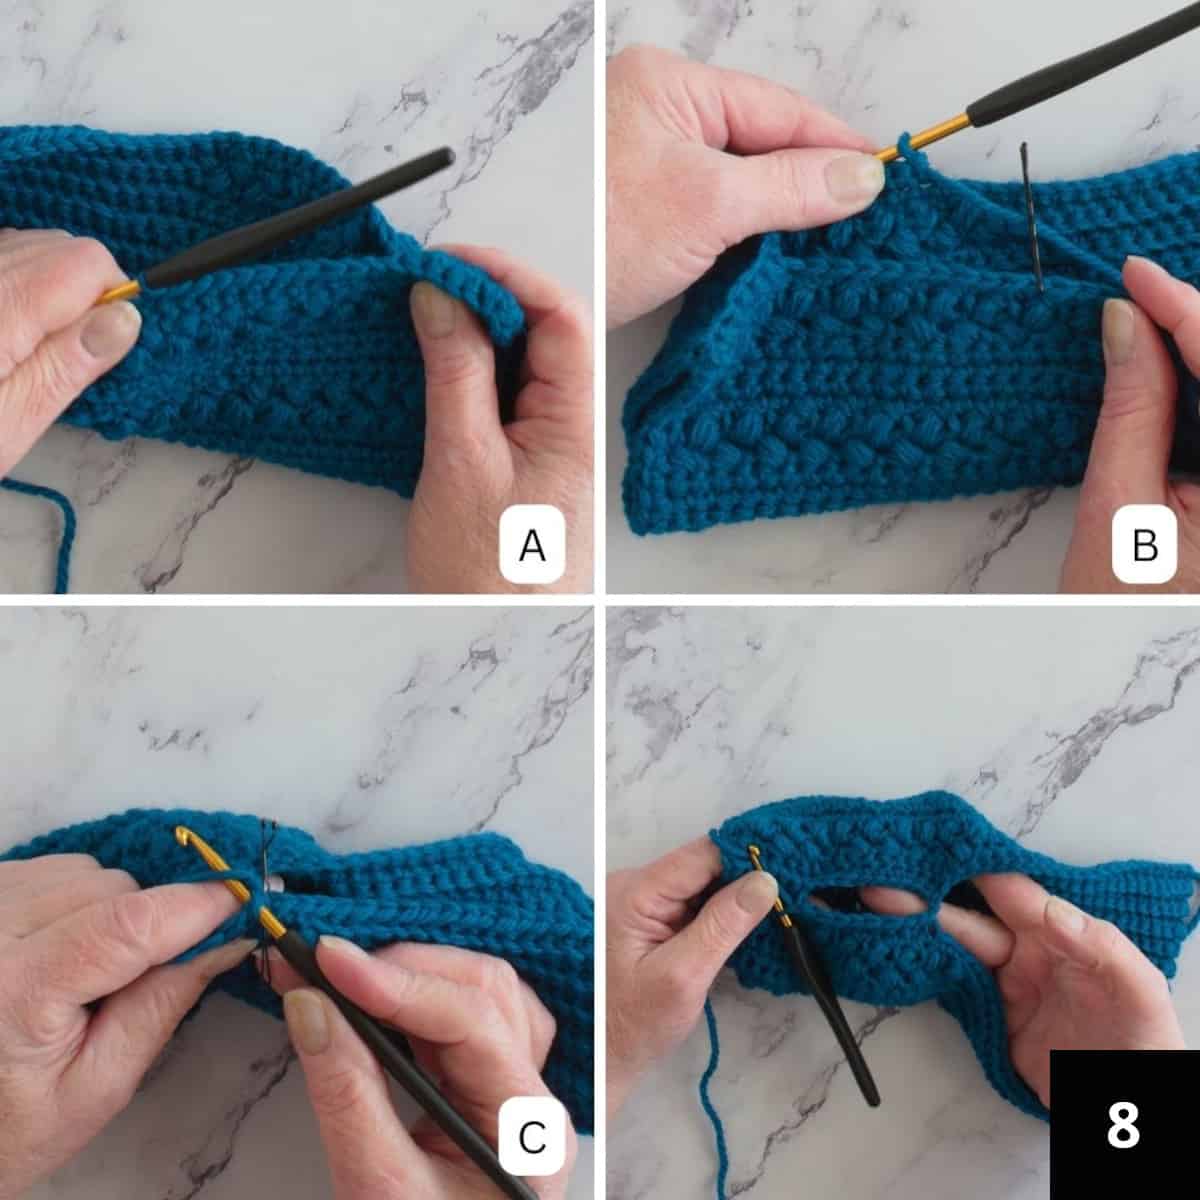
Thumb hole - Separate front from back and work on a single layer at a time.
Into the front layer make 1 single crochet into each of the next 10 stitches.
Next, on the back half, count and use a stitch marker to mark the 10th stitch down from the side seam just made.
Turn the glove so the back is now facing you, single crochet into the marked stitch, then into the 9 remaining stitches back up to the seam made.
Then turn the glove and single crochet back over the ones made on the first side, this should bring you back down to the unjoined side seam.
Joining the lower side seam
Hold both layers together and continue to single crochet down the glove and into both layers until you reach the end, chain 1, cut yarn, and fasten off.
Repeat the pattern to make a second fingerless glove to complete the set.
Finishing
Use a yarn needle to weave in the loose ends.
Don't stop here...
Your next 50 crochet projects are ready inside the Pattern Vault - all printable, ad-free, and ready to download instantly.

More Free Crochet Patterns

Related Guides
- Learn stitch techniques in our basic crochet stitches beginner guide.
- Discover quick gift ideas in our crochet gifts and small projects hub.
Stay Connected
Pin this post - Pin now to and take your skills to the next level.
Leave a comment - We're excited to hear your thoughts! Leave a comment below and let us know what you think.
Share on Instagram or Facebook - Capture the beauty of your finished crochet projects and share it on Instagram or Facebook! Tag us @easybreezycrochet or #ebcrochetcreations so we can see your work!
Copyright Notice - This pattern and its contents are protected by copyright law. It may not be copied, altered, redistributed, resold, translated, or used to produce video tutorials in any format, either in whole or in part.
You are permitted to sell finished items made using this pattern. However, the written pattern itself may not be sold, shared, or distributed in any form. When marketing or displaying your finished items, please photograph your own work and refrain from using any of my original images.
Sharing Guidelines For Roundups - Bloggers you are welcome to include this pattern in roundup posts, as long as you use one photo and link directly back to the original post. For full details, please refer to my Terms of Use page.
Comments
No Comments